Solve WordPress 404 errors can be frustrating, but with the right approach, you can quickly restore your site’s pages and improve user experience. In this guide, we’ll walk you through the most effective methods to identify, troubleshoot, and fix 404 errors in WordPress, ensuring your website runs smoothly and visitors never hit a broken link again.
In this comprehensive guide, we will delve into the intricacies of WordPress 404 errors and equip you with the knowledge and tools to conquer them effectively.
In the dynamic world of website management, WordPress has cemented its position as a leading content management system. Its flexibility and user-friendly interface have made it a go-to platform for millions of website owners.
However, even in the realm of WordPress, there’s no escaping the notorious “404 Error.” If you’ve ever encountered the frustrating “Page Not Found” message on your WordPress site, you’re not alone.
What is a 404 Error?
 A 404 error is an HTTP status code that signifies that the server could not find the requested web page. In simpler terms, it means the page you were trying to reach on a website couldn’t be located on the server. This can be frustrating for users and can potentially harm your website’s usability and SEO if not addressed promptly.
Causes of 404 Errors in WordPress
404 errors in WordPress can occur for a variety of reasons, and understanding the root causes is crucial to resolving them effectively. Here are some common causes: Broken Links: Perhaps the most prevalent cause of 404 errors is broken or dead links. If you’ve linked to a page or resource that no longer exists, users will encounter a 404 error when they click on that link. URL Changes: If you’ve recently changed the URL structure of your website or a specific page without implementing proper redirects, users may land on non-existent URLs. Deleted Pages or Posts: If you’ve deleted a page or post without implementing redirects, any incoming links or bookmarks to that page will result in 404 errors. Plugin or Theme Issues: Sometimes, poorly coded plugins or themes can generate 404 errors. This can happen if the plugin or theme tries to access resources or pages that don’t exist. Server Configuration Problems: In some cases, server misconfigurations or server-related issues can lead to 404 errors.Impact of 404 Errors
 Understanding the impact of 404 errors on your WordPress website is crucial. Ignoring these errors can have several negative consequences:
Poor User Experience: 404 errors frustrate users and can lead to a poor user experience, potentially driving visitors away from your site.
SEO Ranking: Search engines may interpret an abundance of 404 errors as a sign of poor website maintenance, which can negatively affect your SEO rankings.
Lost Traffic and Revenue: Each 404 error represents a missed opportunity to engage with a visitor. Lost traffic can translate into lost revenue, especially if you run an e-commerce site.
Reduced Credibility: A website with numerous 404 errors can lose credibility and trust among its audience.
Understanding the impact of 404 errors on your WordPress website is crucial. Ignoring these errors can have several negative consequences:
Poor User Experience: 404 errors frustrate users and can lead to a poor user experience, potentially driving visitors away from your site.
SEO Ranking: Search engines may interpret an abundance of 404 errors as a sign of poor website maintenance, which can negatively affect your SEO rankings.
Lost Traffic and Revenue: Each 404 error represents a missed opportunity to engage with a visitor. Lost traffic can translate into lost revenue, especially if you run an e-commerce site.
Reduced Credibility: A website with numerous 404 errors can lose credibility and trust among its audience.
How to Resolve 404 Errors in WordPress
Now that we’ve covered the basics let’s explore how to effectively resolve 404 errors in WordPress:Step 1: Identify the 404 Errors
Regularly audit your website for broken links using tools like online link checkers or WordPress plugins. Once identified, update or remove the broken links. Ensure that internal and external links are up to date. Before you can resolve 404 errors, you need to identify which URLs are generating these errors. Here’s how to do it:i) Use Google Search Console (formerly Google Webmaster Tools):
- Log in to your Google Search Console account.
- Select your website property.
- In the left-hand menu, navigate to “Coverage” under “Index.”
- Review the list of URL errors to identify 404 errors.
ii) Use a WordPress Plugin:
- Install and activate a WordPress plugin like “404 Error Monitor” or “Redirection.”
- These plugins will log 404 errors and provide you with a list of URLs generating errors.
iii) Manually Check for Broken Links:
- If you suspect broken links, manually review your website’s content and external links to identify any broken or outdated URLs.
Step 2: Review Permalink Settings
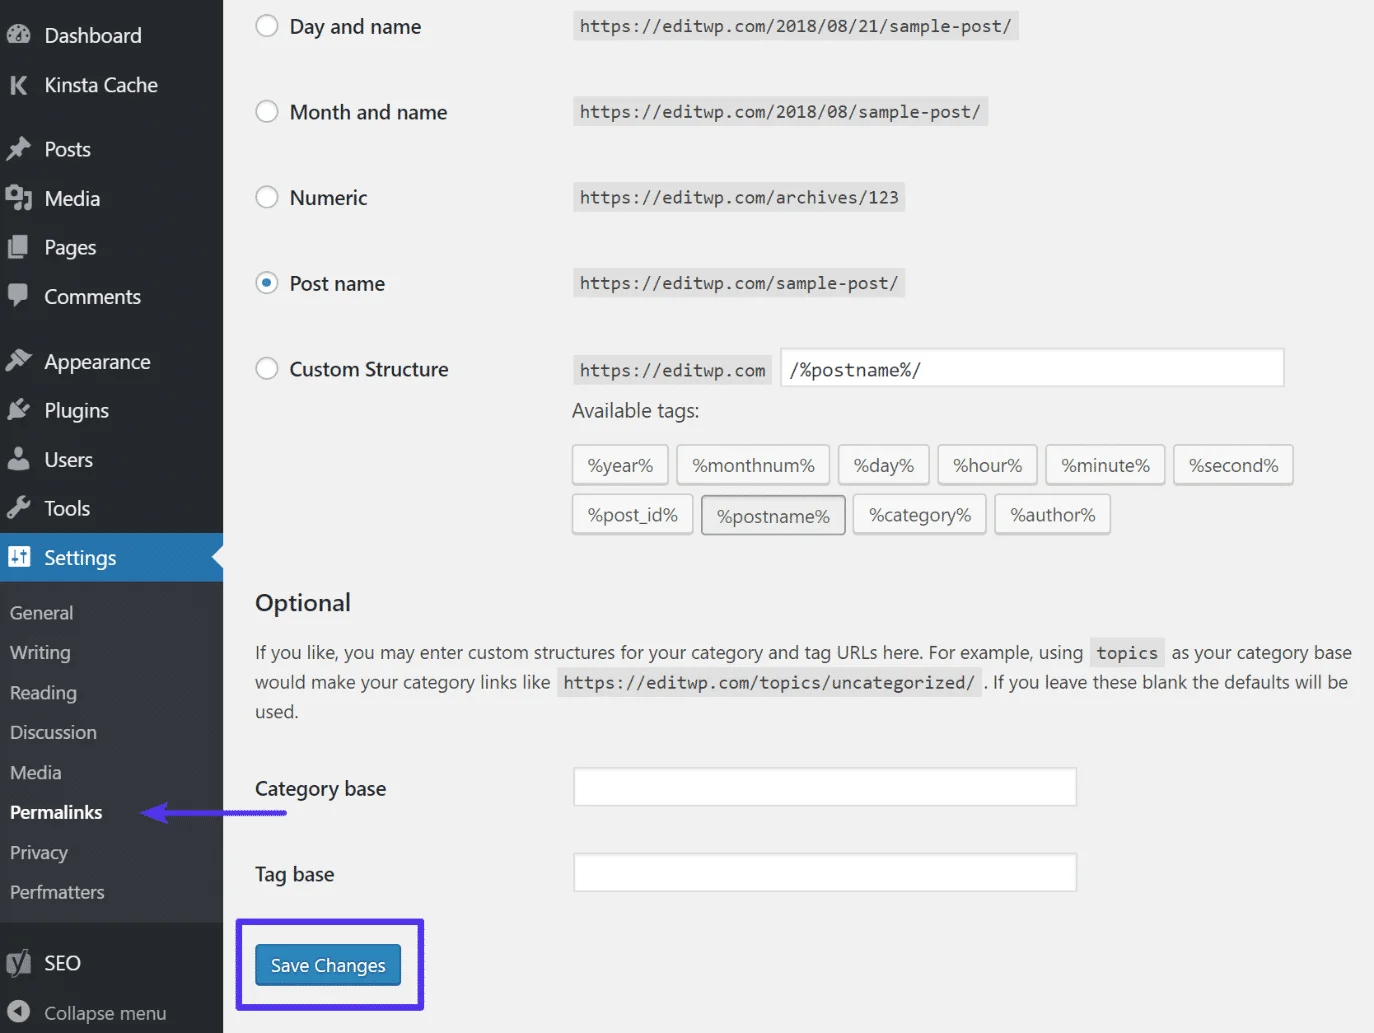 WordPress uses permalinks to structure your website’s URLs. Incorrect permalink settings can lead to 404 errors. To review and adjust your permalink settings:
i) Reset Permalinks Automatically:
- In your WordPress dashboard, go to Settings > Permalinks.
- Ensure your permalink structure is set correctly. Common options include “Post name” or “Day and name.” Make sure it matches the structure of your URLs.
- Click “Save Changes” even if you haven’t made any changes.
ii) Reset Permalinks Manually:
- Access Your WordPress Files: Connect to your website using an FTP client or through your hosting control panel to access your WordPress files.
- Backup Your .htaccess File: Before making any changes, create a backup of your existing .htaccess file. This ensures that you can revert to your previous settings if needed.
- Edit the .htaccess File: Locate the .htaccess file in the root directory of your WordPress installation. You may need to enable the display of hidden files in your FTP client to see it. Open the .htaccess file in a text editor or code editor. Here’s the default WordPress .htaccess code:
# BEGIN WordPressRewriteEngine On RewriteBase / RewriteRule ^index\.php$ - [L] RewriteCond %{REQUEST_FILENAME} !-f RewriteCond %{REQUEST_FILENAME} !-d RewriteRule . /index.php [L] # END WordPress
- Modify the .htaccess File: To reset permalinks to the default settings, you need to replace the existing code in the .htaccess file with the following default WordPress code:
# BEGIN WordPressRewriteEngine On RewriteBase / RewriteRule ^index\.php$ - [L] RewriteCond %{REQUEST_FILENAME} !-f RewriteCond %{REQUEST_FILENAME} !-d RewriteRule . /index.php [L] # END WordPress
- Ensure that you copy and paste the code accurately. It’s crucial to keep the “# BEGIN WordPress” and “# END WordPress” comments intact.
- Save the changes you made to the .htaccess file. Now, upload the modified .htaccess file back to your website’s root directory using your FTP client.
- Go to your WordPress dashboard and navigate to “Settings” > “Permalinks.” Without making any changes, click the “Save Changes” button. This action refreshes your permalink settings and generates a new .htaccess file with the default settings.
- Visit your website’s front-end and test various links to ensure that the permalinks are now functioning correctly.
Step 3: Check for Redirects
Once you’ve identified the URLs generating 404 errors, check if these URLs should be redirected to other pages. This is essential if you’ve changed a page’s URL or if the content has moved. Follow these steps to set up redirects:i) Using the Redirection Plugin:
If you’ve installed the “Redirection” plugin:- Go to your WordPress dashboard and navigate to “Tools” > “Redirection.”
- In the “Add new redirection” section, enter the source URL (the one generating the 404 error) and the target URL (the correct destination).
- Choose “301 Moved Permanently” as the redirection type.
- Save the redirection.
ii) Using the .htaccess File:
If you’re comfortable editing your site’s .htaccess file:- Access your site’s root directory via FTP or your hosting control panel.
- Locate the .htaccess file and open it for editing.
- Add 301 redirects manually using the following format:
Redirect 301 /old-url/ http://www.yourwebsite.com/new-url/
- Save the .htaccess file.
Step 4: Create a Custom 404 Page
 A well-designed custom 404 error page can help users navigate your site even when they encounter a missing page. To create a custom 404 page:
i) Create a New Page:
- In your WordPress dashboard, go to Pages > Add New.
- Design your custom 404 page with helpful information, links to the homepage, popular content, and a search bar.
ii) Publish the Page:
- Publish the page with a title like “Page Not Found” or “404 Error.”
iii) Set the Custom 404 Page:
- To make this page your custom 404 page, install and activate a WordPress plugin like “404page – your smart custom 404 error page.”
iv) Configure the Plugin:
- Configure the plugin to use the page you created as the custom 404 page.
Step 5: Regularly Monitor for 404 Errors
404 errors can occur over time as you update your website. It’s essential to monitor for new errors and address them promptly. Here’s how:i) Use a 404 Monitoring Plugin:
- Install and activate a WordPress plugin like “404 Error Monitor” to keep track of 404 errors as they occur.
ii) Review Reports:
- Periodically review the reports generated by the plugin to identify new 404 errors.
iii) Take Corrective Action
- For each new error, take the appropriate action, such as creating redirects or fixing broken links.
Step 6: Regularly Backup Your Website
Before making significant changes or adjustments to your website, always back up your site. This precaution ensures that you can restore your site to a previous state if an error occurs during the resolution process.i) Use a Backup Plugin:
- Install and configure a reputable WordPress backup plugin like UpdraftPlus or BackupBuddy.
ii) Regularly Schedule Backups:
- Schedule automated backups to run regularly, ensuring that your site’s data is always safe.
Step 7: Test and Verify
After implementing the above steps, it’s essential to thoroughly test and verify that the 404 errors have been resolved. Follow these steps:i) Manually Test URLs:
- Visit the URLs that were previously generating 404 errors to confirm that they now load correctly without errors.
ii) Use Online Tools:
- You can use online tools like “Google PageSpeed Insights” or “Screaming Frog SEO Spider” to crawl your site and identify any remaining 404 errors.
Frequently Asked Questions About Fixing WordPress 404 Errors
What causes 404 errors in WordPress?
404 errors occur when a user tries to access a page that doesn’t exist or has been moved. Common causes include broken links, deleted pages, incorrect URL structures, and permalink issues.
How can I fix 404 errors on my WordPress site?
You can fix 404 errors by updating permalinks, redirecting deleted pages using 301 redirects, checking for broken links, and restoring missing content. Using SEO plugins can help manage redirects efficiently.
Can 404 errors affect my website’s SEO?
Yes, too many 404 errors can negatively impact user experience and search engine rankings. Fixing them ensures visitors and search engines can navigate your site smoothly, improving SEO performance.
Conclusion
In conclusion, addressing and resolving WordPress 404 errors is essential for maintaining a seamless and user-friendly online experience. As we’ve explored throughout this guide, these errors can arise from various sources, including broken links, misconfigured permalinks, or issues with your server.
In the dynamic world of website management, continuous improvement and vigilance are essential. Stay informed about the latest WordPress updates, security practices, and SEO trends to keep your website running smoothly and delivering the best possible experience for your audience.
Quickly Resolve WordPress 404 Errors
Using well-coded WordPress themes like Miion, Seoaal, Gigas, and Digion helps prevent common 404 issues thanks to clean code, SEO-friendly structures, and reliable permalink setups.