In this article, we delve into the depths of the WordPress HTTP error, exploring its potential origins and providing a comprehensive guide on how to troubleshoot and resolve this obstacle.
WordPress stands as a powerful and versatile platform for website creation, boasting a user-friendly interface and a myriad of features. However, even the most reliable systems encounter hiccups now and then. One such common hurdle that WordPress users may face is the HTTP error that occurs when attempting to upload images to the Media Library.
This seemingly elusive HTTP error can be a source of frustration for website administrators, hindering the seamless addition of visual content to their sites. Understanding the root causes of this issue and implementing effective solutions is crucial for maintaining a smooth and efficient WordPress experience.
What is a WordPress HTTP Error?
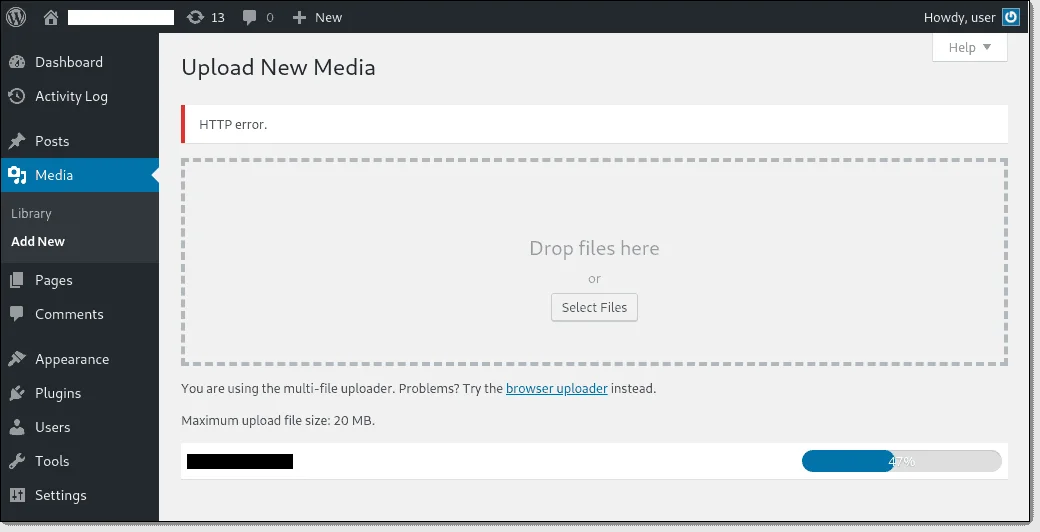
The WordPress HTTP error is a generic term used to describe a common issue that users encounter when attempting to upload images or other media files to their WordPress websites. When this error occurs, users receive a message indicating an issue with the HTTP request, often appearing as “HTTP error” without specific details.
The error typically manifests during the media upload process in the WordPress Media Library or when adding images to posts or pages. Instead of a successful upload, users are presented with the HTTP error, preventing the media file from being added to the website.
What causes WordPress HTTP Error?
The WordPress HTTP Error often appears when uploading images or media to your site, and it can be triggered by multiple factors. Common causes include server limitations such as low PHP memory, conflicts with plugins or themes, oversized image files, or incorrect file permissions. Understanding the root cause is essential to applying the right fix, ensuring smooth media uploads, and keeping your WordPress site running efficiently.
The WordPress HTTP error during image uploads can be caused by various factors, and pinpointing the exact reason can sometimes be challenging. Here are common causes of WordPress HTTP errors:
Server Limitations
Upload Size Limits: Some servers have restrictions on the maximum file size allowed for uploads. If your image file exceeds this limit, it can trigger an HTTP error.
Execution Time Limits: Servers often have a maximum execution time for PHP scripts. If the image upload process takes too long, it may be interrupted, leading to an HTTP error.
File and Folder Permissions
Incorrect file and folder permissions can hinder the upload process. Ensure that the directories and files within your WordPress installation have the correct permissions for the server to read and write files.
PHP Memory Limit
Insufficient PHP memory allocated to WordPress can lead to errors during image uploads. Increasing the PHP memory limit in the wp-config.php file may resolve this issue.
Plugin and Theme Conflicts
Conflicts between plugins or themes and core WordPress functionalities can result in HTTP errors. Deactivating plugins or switching to a default theme can help identify the conflicting component.
ModSecurity and Firewall Issues
Some hosting providers use ModSecurity or firewalls that may block certain requests, including image uploads. Adjusting ModSecurity settings or firewall configurations could resolve the HTTP error.
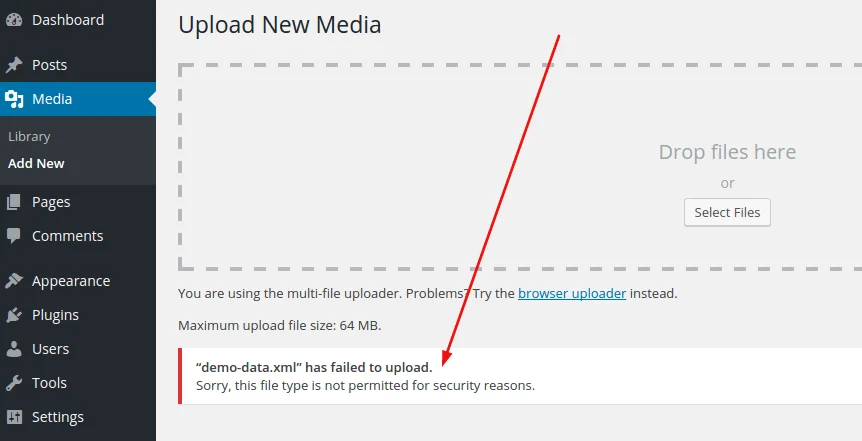
File Format and Image Size
Ensure that the image file format is supported (commonly JPEG, PNG, GIF) and that the file size does not exceed any limitations set by your server or WordPress configuration.
Theme-Specific Problems
Certain themes may have specific functions or scripts that conflict with the upload process. Switching to a default WordPress theme can help determine if the issue is theme-related.
Hotlink Protection
Hotlink protection, a feature provided by some hosting providers, can prevent direct linking to images. Disabling this feature might resolve HTTP errors associated with image uploads.
Outdated Software
Running outdated versions of WordPress, plugins, or themes can lead to compatibility issues. Keeping all components up-to-date can help prevent HTTP errors.
Server-Side Cache
Caching mechanisms on the server side may interfere with file uploads. Clearing server-side cache or temporarily disabling caching plugins can help identify and resolve the issue.
Browser and Connectivity Issues
Problems with your internet connection or the browser you are using might contribute to HTTP errors. Trying a different browser or clearing browser cache could help.
CDN Configuration:
Incorrect Content Delivery Network (CDN) settings may disrupt the image upload process. Verify that your CDN is correctly configured according to your provider’s guidelines.
Identifying the specific cause of a WordPress HTTP error often involves a process of elimination, where users systematically test and address each potential factor until a resolution is found. It’s essential to approach troubleshooting with caution, make backups before making significant changes, and consider seeking assistance from your hosting provider or the WordPress community if needed.
Troubleshooting Steps
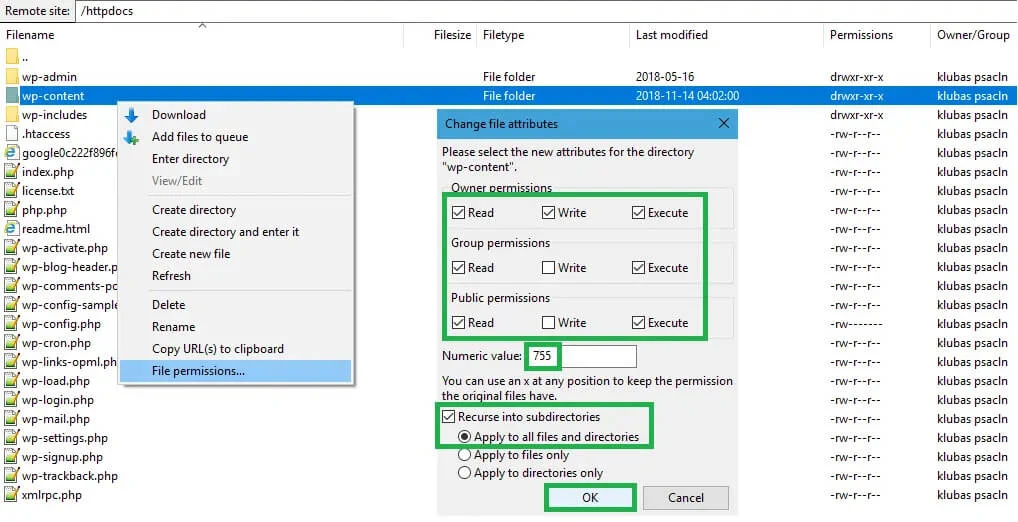
1. Check File Permissions
File permissions play a critical role in ensuring that WordPress can read and write files as needed. Incorrect permissions can lead to the HTTP error during image uploads.
Connect to your server using an FTP client or a file manager provided by your hosting platform and review the permissions of your WordPress files and folders. Correct permissions are usually set to 755 for directories and 644 for files.
2. Modify .htaccess File
The .htaccess file is a configuration file for Apache servers, and sometimes security settings may interfere with file uploads. By adding specific directives to the .htaccess file, you can address potential conflicts.
The provided code snippet disables certain security filters that may be causing the HTTP error. Ensure to make a backup of the .htaccess file before making any changes.
3. Increase PHP Memory Limit
One of the most common causes of the WordPress HTTP Error is insufficient PHP memory. When WordPress tries to process large media files or run multiple plugins simultaneously, low memory can trigger upload failures. This simple adjustment often resolves the error and improves overall site performance.
Make sure to pick the method that fits your environment and access permissions best from the four options provided.
i) Increase PHP Memory Limit with wp-config.php
- To increase the PHP memory limit using the wp-config.php file, follow these steps:
- Locate the wp-config.php file in the root directory of your WordPress installation.
- Open the file using a text editor.
- Add the following line of code near the top, just after the opening
define('WP_MEMORY_LIMIT', '256M');
- Adjust the value ‘256M’ based on your specific requirements. This example sets the limit to 256 megabytes.
- Save the changes to the wp-config.php file.
- This code sets a higher PHP memory limit specifically for your WordPress site.
ii) Increase PHP Memory Limit in cPanel
If you have access to cPanel, you can adjust the PHP memory limit through the following steps:
- Log in to your cPanel.
- Navigate to the “Software” or “Software and Services” section.
- Look for the “Select PHP Version” or “MultiPHP INI Editor” option.
- In the editor, find and increase the value for memory_limit. Set it to your desired limit, such as 256M.
- Save the changes.
- This method adjusts the PHP memory limit for your entire hosting account.
iii) Increase PHP Memory Limit with php.ini:
To increase the PHP memory limit using a php.ini file, follow these steps:
- Create a file named php.ini if it doesn’t already exist.
- Add the following line to the php.ini file:
memory_limit = 256M
- Modify the value as needed.
- Save the php.ini file.
- Upload the file to the root directory of your WordPress installation.
- This code sets a specific PHP memory limit for your WordPress site.
iv) Increase PHP Memory Limit with .htaccess:
To increase the PHP memory limit using the .htaccess file, follow these steps:
- Locate the .htaccess file in the root directory of your WordPress installation.
- Open the file using a text editor.
- Add the following line of code:
php_value memory_limit 256M
- Adjust the value based on your requirements.
- Save the changes to the .htaccess file.
- This code sets the PHP memory limit for your WordPress site through Apache configuration.
It’s important to note that not all hosting providers allow modification of these settings, and some might require you to contact support for such adjustments. Always make backups before modifying important files to avoid potential issues.
4. Deactivate Plugins
Conflicting plugins are a common source of the HTTP error. Plugins are additional pieces of software that extend and enhance the functionality of your WordPress site. However, not all plugins are created equally, and conflicts between different plugins or between a plugin and WordPress core can occur. Such conflicts might lead to issues, including the HTTP error during image uploads.
By deactivating all plugins, you temporarily disable their functionalities, allowing you to test if the HTTP error persists without their influence. If the error disappears after deactivation, it suggests that one or more plugins might be the root cause.
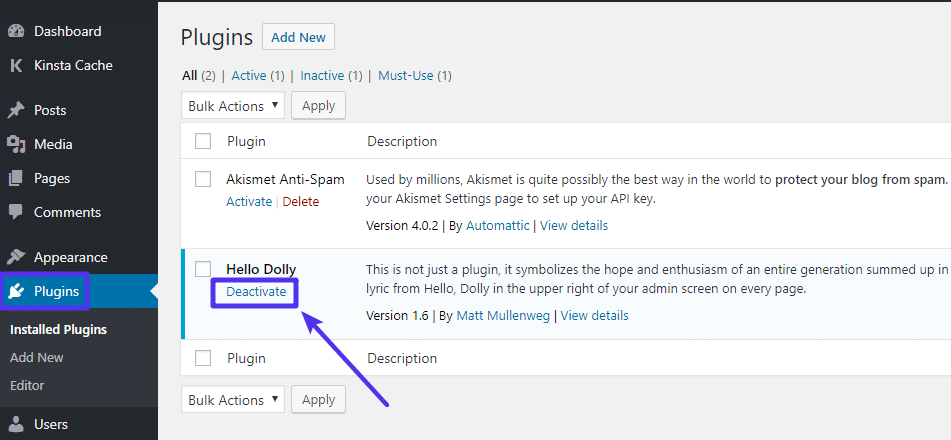
How to Deactivate Plugins:
- Log in to your WordPress Admin Dashboard.
- In the WordPress dashboard, go to the “Plugins” menu.
- Select all plugins or use the bulk action option to deactivate them.
- Attempt to upload an image to see if the HTTP error persists.
- If the HTTP error disappears after deactivating all plugins, it indicates that one or more plugins were causing the issue.
- Begin reactivating plugins one at a time.
- After each activation, attempt to upload an image to identify the specific plugin triggering the error.
- If the error reoccurs after activating a specific plugin, you’ve likely identified the culprit.
What to Do Next:
- Reach out to the developers of the identified plugin causing the issue.
- Inquire about updates or alternative solutions to address the conflict.
- If a plugin lacks updates or the developer does not provide a solution, consider finding alternative plugins with similar functionalities.
- Regularly update your plugins to ensure compatibility with the latest WordPress version and prevent conflicts.
By systematically deactivating and reactivating plugins, you can pinpoint the specific plugin causing the HTTP error and take appropriate measures to resolve the issue. This process is an integral part of troubleshooting and maintaining a stable and error-free WordPress site.
5. Switch to the Default Theme
Themes can also contribute to upload issues. Activate a default WordPress theme (such as Twenty Twenty-One) to rule out theme-related problems. If the error persists, you can be more confident that it’s not related to your theme.
6. Check Uploads Folder Path
WordPress allows users to customize the location where uploaded media files are stored. This setting is essential for organizing and managing your site’s media library. If the uploads folder path is misconfigured, WordPress may encounter difficulties saving and retrieving media files, resulting in the HTTP error during image uploads.
How to Check the Uploads Folder Path
- Log in to your WordPress Admin Dashboard
- In the WordPress dashboard, go to “Settings” and then select “Media.”
- Look for the field labeled “Store uploads in this folder.”
- Verify that the path specified in this field is accurate.
Example of Correct Path
- The default and commonly used path is wp-content/uploads/.
- Ensure that there are no typos, extra spaces, or incorrect characters in the path.
What to Look For:
- The correct path should lead to the “uploads” folder within the “wp-content” directory.
- Typos or incorrect paths might disrupt the image upload process.
- For example, wp-content/uploads is correct, while wp-content/upload or wp-content/uploads/extra would be incorrect.
Why It Matters:
Media Organization:
The correct uploads folder path ensures that media files are properly organized in the designated directory.
Prevention of Upload Errors:
- A misconfigured path can lead to errors during the image upload process.
- Verifying and correcting the path helps prevent these errors.
How to Correct the Path:
Update the Field:
- If the path is incorrect, update the field with the correct path.
- Save the changes to apply the corrected uploads folder path.
By ensuring that the uploads folder path is correctly configured, you contribute to a smooth and error-free image upload process in WordPress. This step is particularly important when troubleshooting issues related to the HTTP error, as a misconfigured path can be a common source of problems.
7. Update WordPress and Plugins
Keeping your WordPress installation and plugins up-to-date is crucial for security and performance. Developers release updates to address bugs and improve compatibility. Regularly check for updates and apply them to reduce the likelihood of encountering HTTP errors during image uploads.
8. Disable mod_security
Disabling ModSecurity involves adjusting configurations either through the .htaccess file or using cPanel, depending on your server setup and access privileges. Here’s a detailed explanation of how to disable ModSecurity using both methods:
Disabling ModSecurity via .htaccess
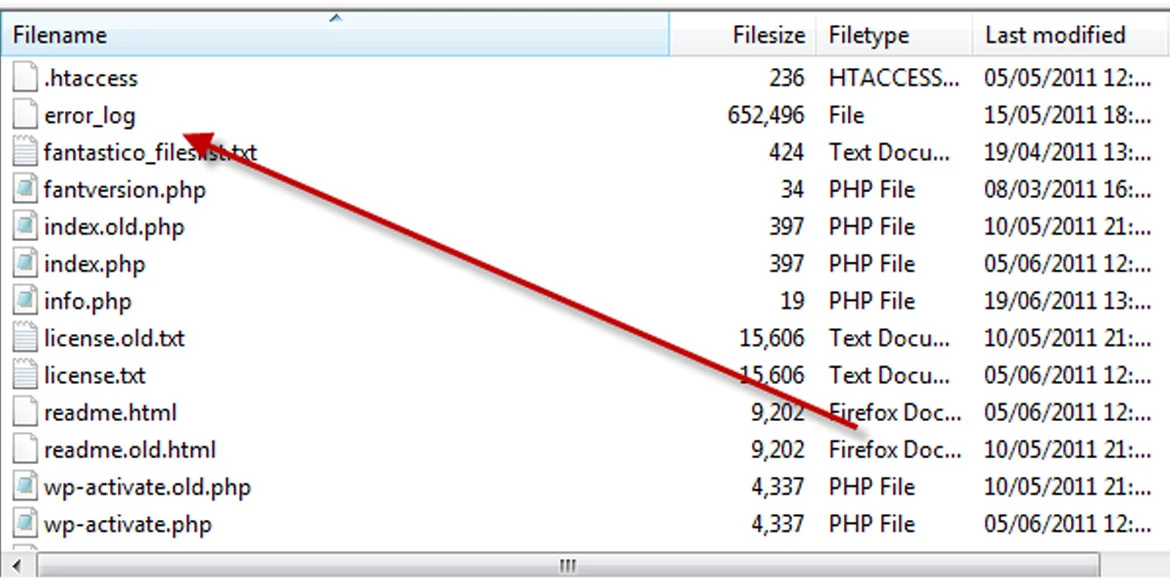
- Locate your .htaccess file:
- Look for the .htaccess file.
- Open the .htaccess file in a text editor of your choice.
Add the following code at the top:
<IfModule mod_security.c>
SecFilterEngine Off
SecFilterScanPOST Off
</IfModule>
This code turns off the ModSecurity engine and scanning for POST requests.
Save the .htaccess file and upload it back to your server if necessary.
Disabling ModSecurity via cPanel:
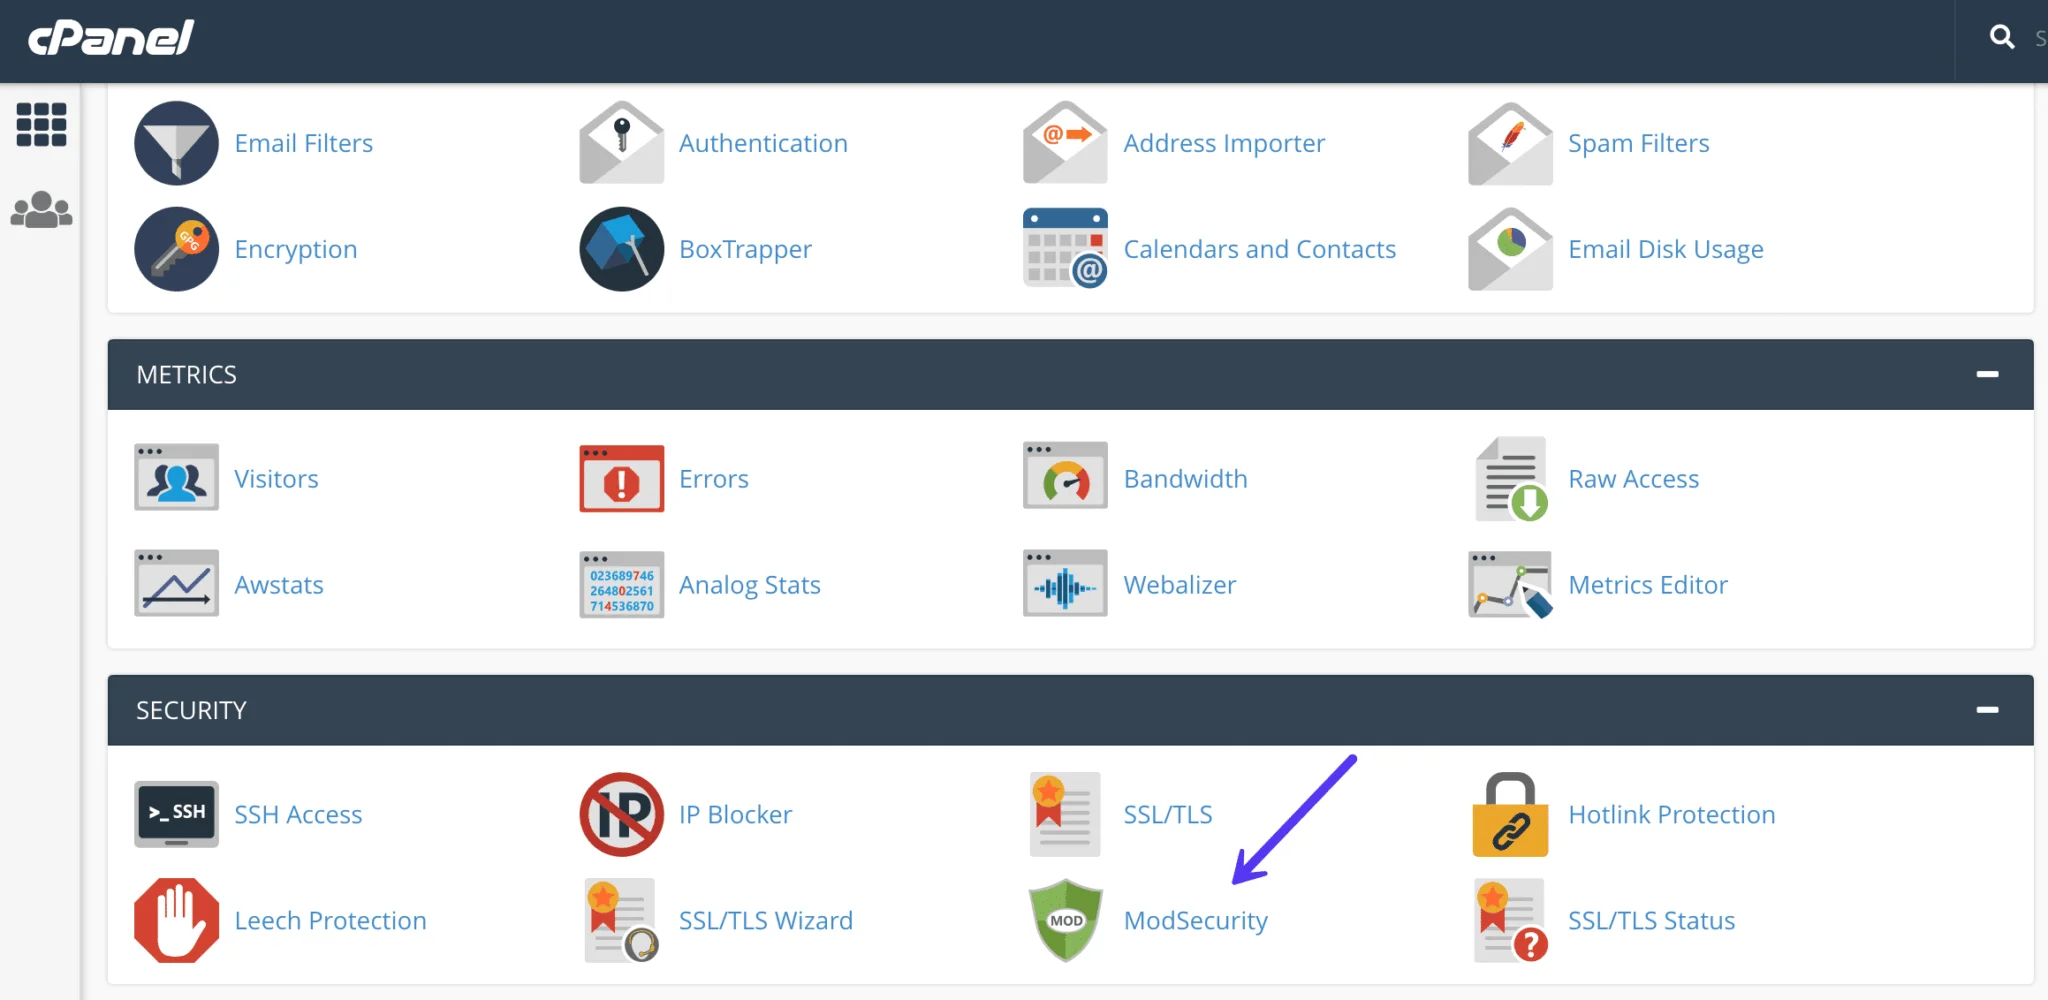
- Access your hosting account’s cPanel dashboard.
- Navigate to the “ModSecurity” section
- Depending on your hosting provider’s interface, you may find ModSecurity in the “Security” or “Server” section.
- Look for a list of domains or websites associated with your hosting account.
- Find the toggle switch next to the domain for which you want to disable ModSecurity.
- Change the status from “On” to “Off” for the selected domain.
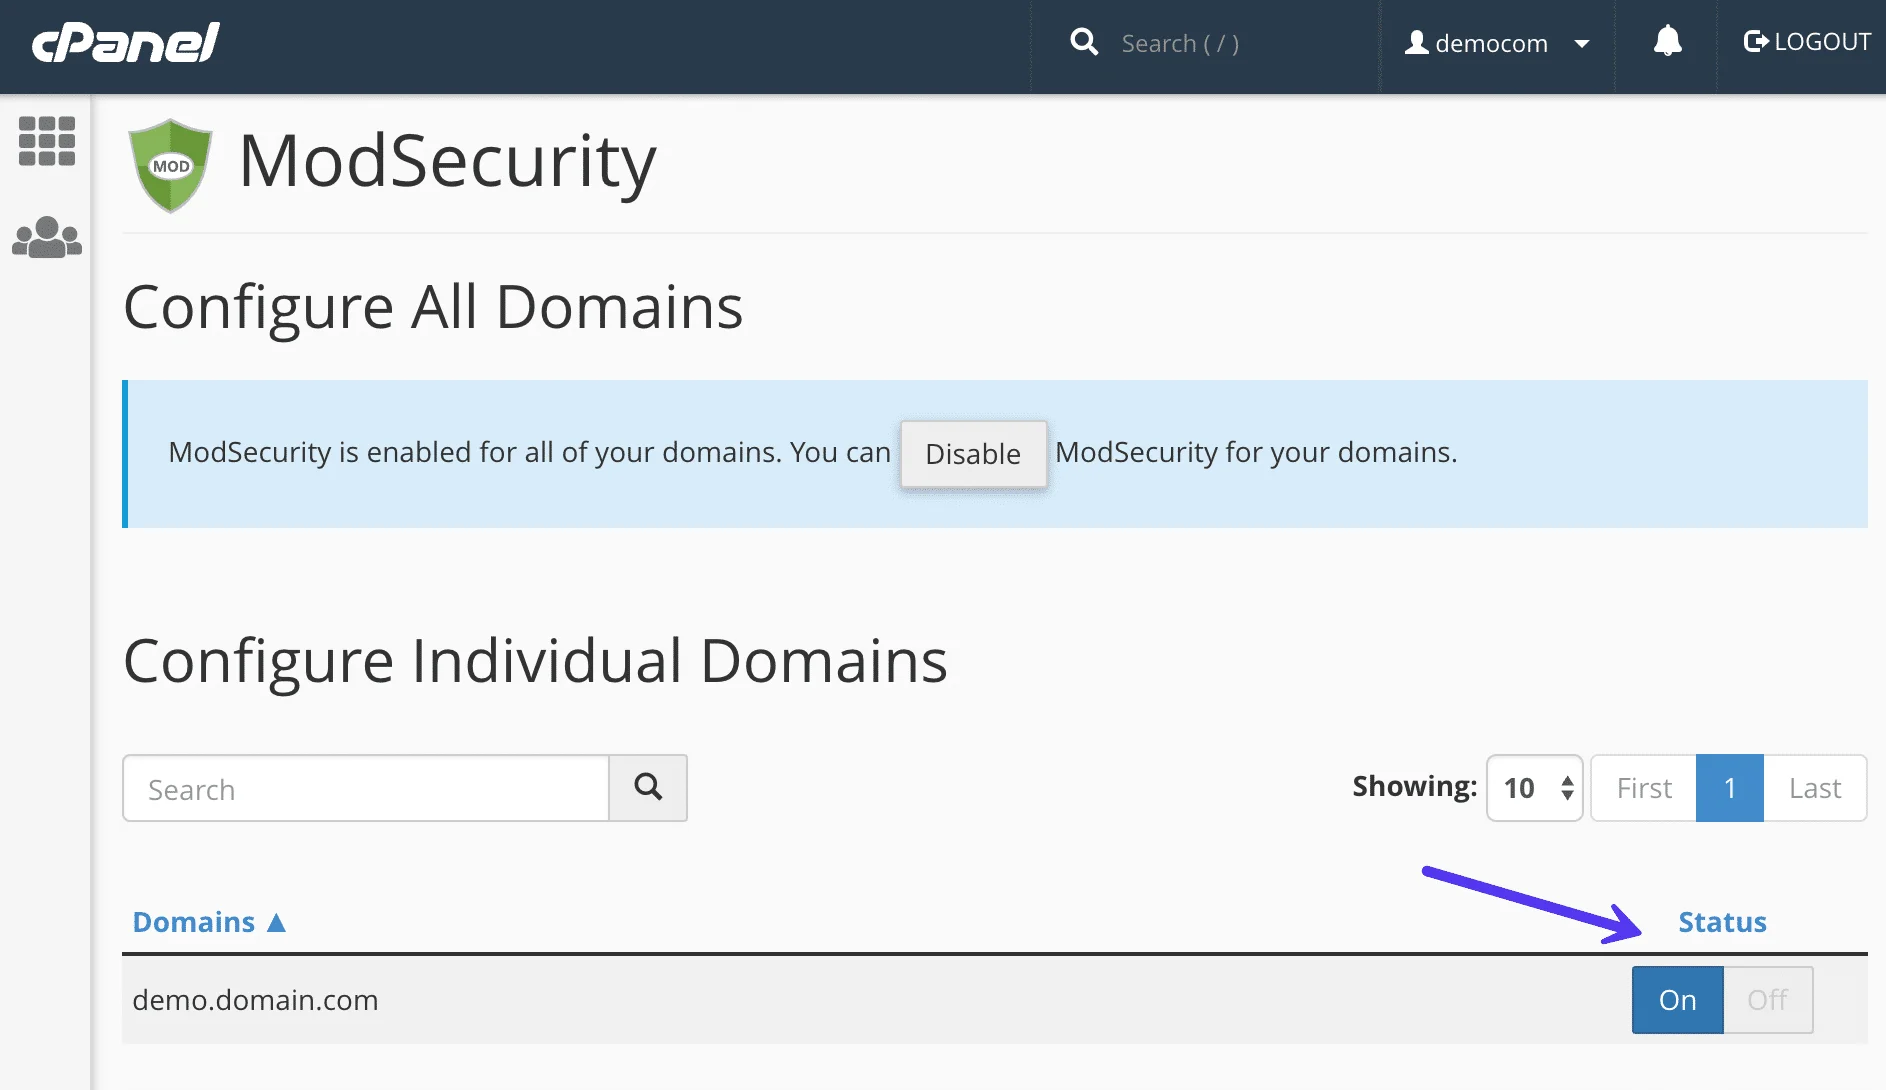
Some cPanel interfaces might require you to click a “Save” or “Apply” button to confirm the changes.
Important Considerations:
- The availability and location of ModSecurity settings can vary between hosting providers. If you can’t find it in cPanel, contact your hosting support for guidance.
- Disabling ModSecurity may have security implications, as it is designed to protect against various web application attacks. Only disable it temporarily for troubleshooting purposes and re-enable it once the issue is resolved.
- If you’re experiencing the WordPress HTTP error even after disabling ModSecurity, consider re-enabling it and exploring alternative solutions to the issue.
- Ensure that you have the necessary permissions to edit and save changes to the .htaccess file.
Disabling ModSecurity can be a useful troubleshooting step, but it’s important to exercise caution and consult with your hosting support if needed. Always prioritize security and consider re-enabling ModSecurity once the issue is resolved.
9. Investigate Server Space and Quotas
Examine your server’s available space and quotas. If your server is running low on disk space, it could hinder the uploading process. Regularly monitor your server’s storage capacity and consider freeing up space or upgrading your hosting plan if necessary.
10. Examine Internet Connection and Browser Compatibility
Sometimes, issues with your internet connection or browser can interfere with file uploads. Ensure a stable internet connection and try using a different browser to eliminate potential browser-related problems. Clearing browser cache and cookies can also be beneficial.
11. Utilize a File Uploads Debugging Plugin
WordPress offers various debugging plugins that can provide detailed error logs, helping you pinpoint the exact cause of the HTTP error. Plugins like WP-Debugging and Query Monitor can assist in identifying issues and conflicts during the image upload process.
12. Implement CDN Configuration
If you are using a Content Delivery Network (CDN), ensure it is correctly configured. Improper CDN settings might disrupt file uploads. Refer to your CDN provider’s documentation or support for guidance on proper configuration.
13. Review Hosting Firewall Settings
Check your hosting provider’s firewall settings. Firewalls can sometimes block certain file types or operations. Your hosting support can assist in reviewing and adjusting firewall settings to facilitate smooth image uploads.
14. Consider Alternative Image Uploading Methods
If all else fails, consider alternative methods for uploading images. This could include using FTP to upload images directly to the server and then adding them to the Media Library manually. While not as user-friendly, it can be a temporary workaround.
15. Examine Image File Format and Size
Occasionally, issues may arise due to the specific format or size of the image files you are attempting to upload. Ensure that the image file formats are supported (commonly JPEG, PNG, GIF) and check if the file size exceeds any limitations set by your server or WordPress configuration. Reducing the image size or trying a different file format might resolve the HTTP error.
16. Disable Hotlink Protection:
If your hosting provider has hotlink protection enabled, it could interfere with image uploads. Hotlink protection prevents other websites from directly linking to your images. Disable this feature temporarily and check if it resolves the HTTP error.
17. Inspect .user.ini File to Fix WordPress HTTP Error
For servers using PHP as a CGI module, there might be a .user.ini file in your WordPress installation. Check its content for any unusual configurations or directives that could impact file uploads. Adjustments to these settings might resolve the HTTP error.
18. Explore Browser Console to Resolve WordPress HTTP Error
When attempting to upload an image, open your browser’s developer console (usually accessible by right-clicking on the page and selecting “Inspect,” then navigating to the “Console” tab) to check for any JavaScript errors or warnings. Addressing these issues might alleviate the HTTP error.
19. Monitor Error Logs to Fix WordPress HTTP Error Quickly
Examine your server’s error logs for any entries related to the HTTP error during image uploads. Error logs can provide detailed information about the nature of the problem, aiding in a more targeted resolution. Access logs and error logs are typically available through your hosting control panel.
20. Consider Professional Support for WordPress HTTP Error
If, despite exhaustive efforts, the HTTP error persists, consider seeking professional support. WordPress developers or specialists in server management can conduct an in-depth analysis of your website’s configuration and identify and resolve complex issues that might be causing the error.
21. WordPress HTTP Error: Stay Informed with Latest Updates
WordPress is continuously evolving, with updates addressing bugs, security issues, and compatibility problems. Stay informed about the latest WordPress releases and update your installation promptly. A well-maintained WordPress version is less likely to encounter known issues, including the HTTP error during image uploads.
WordPress HTTP Error – Your Questions Answered
1. What does the WordPress HTTP error mean?
The WordPress HTTP error occurs when there’s a problem during the image upload process. It may prevent images from being uploaded to the media library.
2. Why am I getting the HTTP error when uploading images?
Several factors can contribute, including insufficient server resources, issues with file permissions, conflicting plugins or themes, or problems with the image file itself.
3. How do I troubleshoot the WordPress HTTP error?
Start by checking the file size, ensuring proper file formats, disabling conflicting plugins, and verifying server resources. The guide provides step-by-step solutions.
4. Can I fix the HTTP error without technical knowledge?
Yes, the guide offers user-friendly solutions. Try the recommended steps, and if the issue persists, consult with your hosting provider or seek assistance from a developer.
5. What are common plugin-related causes of the HTTP error?
Certain security or optimization plugins may interfere with the image upload process. Temporarily deactivate plugins to identify the culprit.
6. Will changing the theme help fix the HTTP error?
Yes, some themes may conflict with image uploads. Switching to a default WordPress theme and testing the upload can help identify if the theme is the issue.
Final Thoughts
In the dynamic world of website management, addressing and overcoming challenges is an integral part of the journey. The WordPress HTTP error during image uploads to the Media Library is undoubtedly one such challenge that can test the patience of even the most seasoned users. However, armed with knowledge and the right set of solutions, conquering this hurdle becomes not just a possibility but a manageable task.
As we conclude our exploration into the intricacies of fixing the WordPress HTTP error, it’s crucial to emphasize the significance of a systematic approach. Identifying the root causes, whether they lie in server configurations, plugin conflicts, or other factors, allows users to apply targeted solutions tailored to their specific scenarios.
Say Goodbye to WordPress HTTP Error – Quick Media Upload Solution
Struggling with the WordPress HTTP Error while uploading images to your media library? This quick guide walks you through proven fixes to get your uploads working again in just minutes. From server settings to plugin conflicts, you’ll learn the easiest ways to resolve the issue and keep your WordPress site running smoothly.