Let’s embark on a journey to uncover the mysteries of WordPress Memory Exhaustion Errors and equip ourselves with the knowledge and tools needed to overcome this challenge.
In the dynamic world of website development, WordPress stands as a powerful and versatile platform, allowing users to create and manage stunning websites with ease. However, like any robust system, WordPress is not immune to challenges, one of which is the infamous memory exhaustion error.
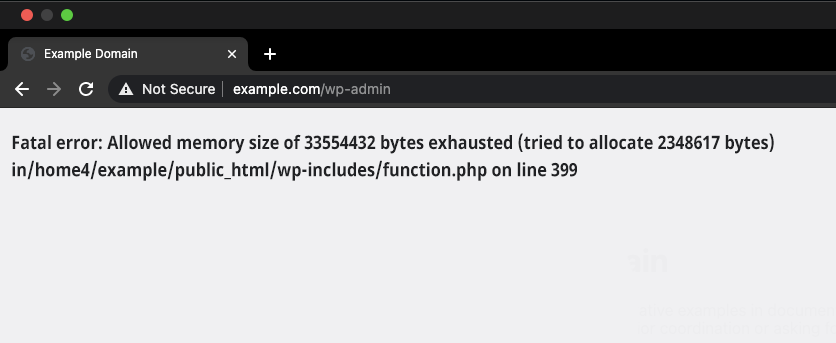
Picture this: you’re diligently working on your WordPress website, making updates, adding content, or optimizing its functionality when suddenly, your screen displays the dreaded message: “Fatal error: Allowed memory size exhausted.” This cryptic error can be a frustrating roadblock for website owners, developers, and administrators.
But fear not! In this comprehensive guide, we’ll delve into the causes, solutions, and prevention of WordPress memory exhaustion errors. Whether you’re a seasoned developer or just starting your WordPress journey, understanding and tackling these errors is essential to maintain a smooth and efficient website.
What is WordPress Memory Exhaustion Error?
A WordPress Memory Exhaustion Error, often referred to as a “Fatal Error: Allowed memory size exhausted,” is a common issue that occurs when a WordPress website exceeds its allocated memory limit while attempting to execute a script or process. In simple terms, it means that the server hosting your WordPress site doesn’t have enough memory (RAM) available to perform a specific task.
This error can manifest in different ways, but it typically displays a message similar to “Fatal error: Allowed memory size of [X] bytes exhausted.” The value of [X] indicates the memory limit that has been exceeded. Memory exhaustion errors can occur during various tasks, such as installing or updating plugins, themes, or WordPress itself, importing large amounts of data, or running resource-intensive scripts.
The error message is a safety mechanism in PHP, the programming language that powers WordPress, designed to prevent a script from consuming all available memory and potentially crashing the server.
While it’s a protective feature, memory exhaustion errors can be frustrating for website owners and developers. They require troubleshooting to identify the root causes and implementing solutions to prevent recurrence.
Memory exhaustion errors in WordPress are typically accompanied by error messages that may look like this:
"Fatal error: Allowed memory size of X bytes exhausted (tried to allocate Y bytes) in..."
"Out of memory (allocated X) (tried to allocate Y bytes) in..."
"PHP Fatal error: Allowed memory size of X bytes exhausted (tried to allocate Y bytes) in..."
"500 Internal Server Error"
These error messages can be frustrating, but they are meant to prevent your site from overloading the server’s memory, which could lead to a complete server crash.
Common Causes of Memory Exhaustion Errors
Unoptimized Plugins and Themes: One of the most common causes of memory exhaustion errors is poorly coded or resource-intensive plugins and themes. These can significantly increase your website’s memory usage. Large Media Files: Uploading large images or videos can strain server resources, especially if they’re not properly optimized for the web. Inefficient Code: Poorly coded custom scripts or themes may not release memory properly, leading to memory leaks. High Traffic and Concurrent Users: A sudden surge in website traffic or too many concurrent users can increase memory usage.
Solutions to Resolve Memory Exhaustion Errors
1. Increase PHP Memory Limit
 Increasing the PHP memory limit is one of the most common and effective ways to resolve memory exhaustion errors. To do this:
- Access Your WordPress Files: You can access your WordPress files through FTP or a file manager in your hosting control panel.
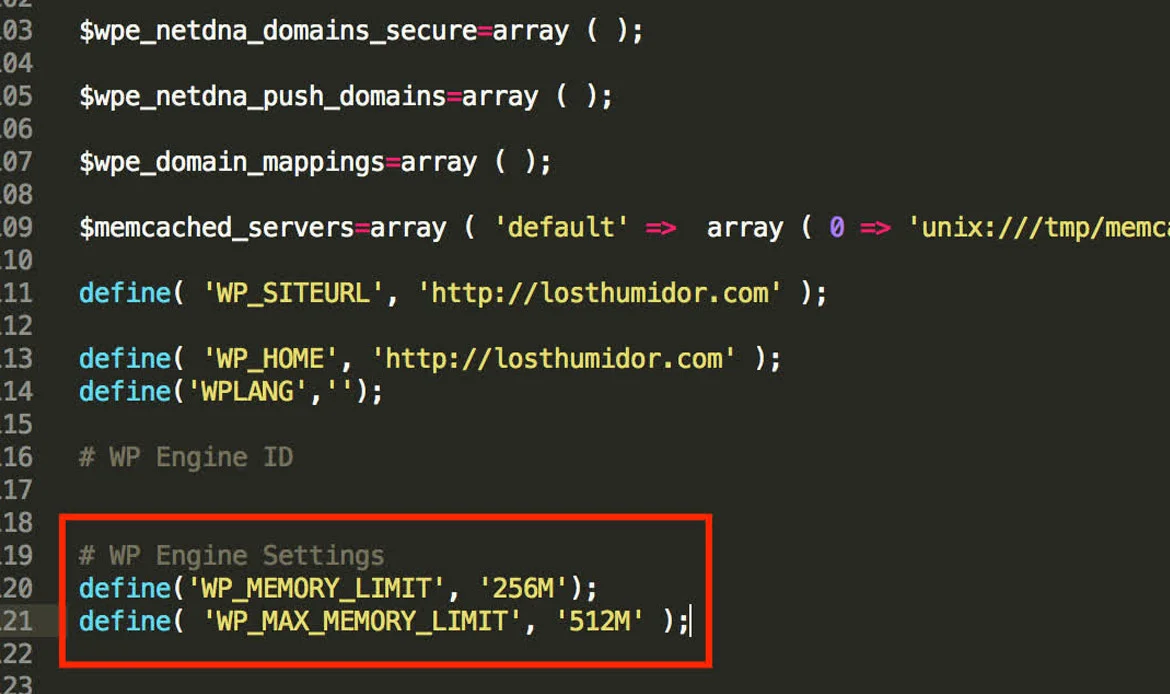
- Edit the wp-config.php File: Look for the wp-config.php file in your WordPress root directory and edit it.
define('WP_MEMORY_LIMIT', '256M');
You can adjust the memory limit value as needed.
Save and Upload: Save the changes to the wp-config.php file and upload it back to your server.
Increasing the memory limit allows your website to allocate more resources for handling scripts and processes, reducing the likelihood of memory exhaustion errors.
2. Identify and Disable Problematic Plugins or Themes
 Memory exhaustion errors can often be caused by poorly coded or resource-intensive plugins or themes. To identify the culprits:
Access Your WordPress Dashboard:
Log in to your WordPress admin area.Deactivate Plugins:
Navigate to the “Plugins” section and deactivate all recently installed or updated plugins.Switch to a Default Theme:
Change your theme to one of the default WordPress themes (e.g., Twenty Twenty-One).Check if the Error Persists:
After deactivating plugins and changing the theme, check if the error is still present. If it’s gone, reactivate plugins and switch back to your original theme one by one until you identify the culprit.Remove or Replace the Problematic Plugin or Theme:
Once you’ve identified the problematic plugin or theme, consider replacing it with an alternative or contacting the developer for support.3. Optimize Your Website
Optimizing your website involves various performance enhancements to reduce the load on your server and decrease the chances of memory exhaustion errors. Some optimization techniques include:- Compressing images to reduce file sizes and improve loading times.
- Minifying CSS and JavaScript files to make them more efficient.
- Enabling browser caching to reduce server requests.
- Using a content delivery network (CDN) to distribute assets to users from servers closer to their location.
- Cleaning up your WordPress database by removing unnecessary data and revisions.
- These optimizations help your website operate more efficiently, using fewer resources.
4. Evaluate Your Hosting Plan
 The hosting plan you choose plays a significant role in your website’s performance and resource availability. If you consistently encounter memory exhaustion errors, it might be time to assess your hosting provider and plan. Consider:
- Upgrading to a higher-tier hosting plan with more resources.
- Moving to a managed WordPress hosting provider that specializes in WordPress optimization.
- Switching to a virtual private server (VPS) or dedicated server for greater control and resources.
5. Implement Object Caching
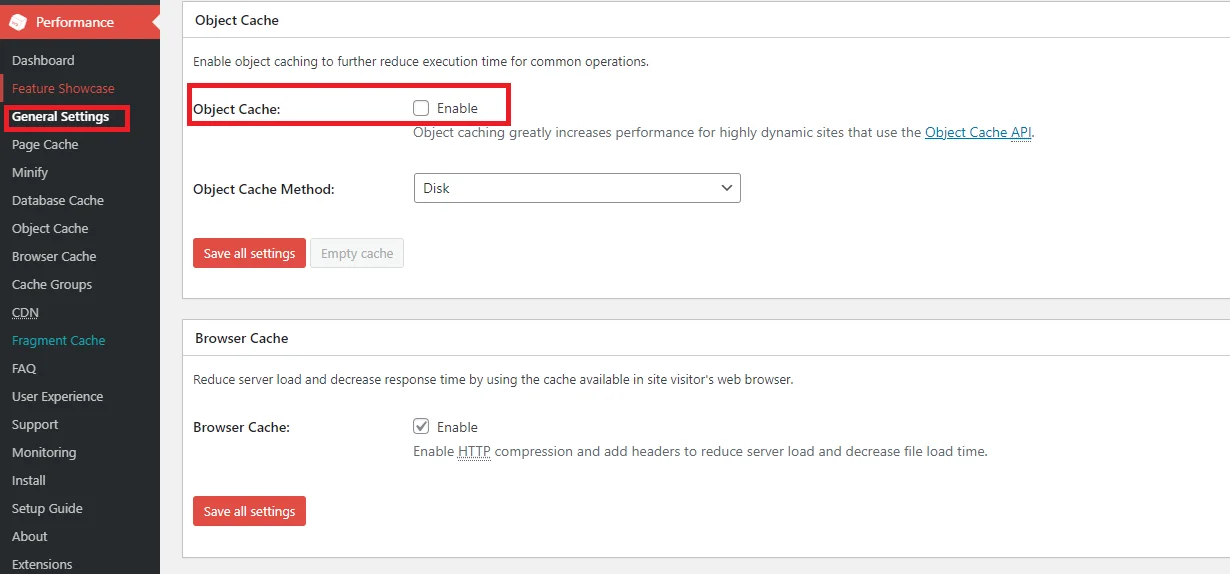 Object caching can significantly improve your website’s performance by storing frequently used data in memory, reducing the need to repeatedly fetch it from the database. Popular caching plugins like W3 Total Cache and WP Super Cache offer object caching options.
To implement object caching:
Object caching can significantly improve your website’s performance by storing frequently used data in memory, reducing the need to repeatedly fetch it from the database. Popular caching plugins like W3 Total Cache and WP Super Cache offer object caching options.
To implement object caching:
- Install and configure a caching plugin.
- Enable object caching in the plugin’s settings.
- Test your website’s performance to ensure that the memory exhaustion errors are resolved.
6. Reduce HTTP Requests
Excessive HTTP requests can strain your server’s memory. To reduce the number of requests:- Minimize external scripts and resources, such as third-party tracking codes.
- Combine CSS and JavaScript files to decrease the number of files loaded.
- Use asynchronous loading for scripts and defer non-essential scripts.
- By reducing HTTP requests, you can alleviate the memory burden on your server.
7. Implement Content Delivery Networks (CDNs)
Regularly monitoring your website’s performance and debugging issues is essential for identifying memory leaks, inefficient code, or resource-hungry processes. You can use tools like New Relic, Query Monitor, or Xdebug to help with debugging and profiling. Content Delivery Networks (CDNs) are services that store and distribute your website’s content to multiple data centers worldwide. By using a CDN, you can offload a significant portion of your website’s resource-intensive tasks, such as image and file delivery, to servers closer to your visitors. This can alleviate the load on your hosting server and reduce memory exhaustion errors. To implement a CDN:- Sign up for a CDN service (popular options include Cloudflare, MaxCDN, and Amazon CloudFront).
- Configure the CDN settings to cache and serve your website’s static assets.
- Update your website’s DNS settings to point to the CDN’s servers.
8. Use a Reliable Caching Plugin
Caching plugins are essential tools for optimizing your WordPress website. They generate static HTML files of your dynamic content, reducing the need for repeated database queries and PHP processing. Popular caching plugins include WP Super Cache, W3 Total Cache, and WP Rocket. To make the most of a caching plugin:- Install and configure a caching plugin that suits your website’s needs.
- Enable page caching and browser caching to reduce server load and improve loading times.
- Regularly purge the cache to ensure your visitors see updated content.
- Using a caching plugin is an effective way to lower the resource demands on your server.
9. Check for Resource-Hungry Plugins and Themes
Some plugins and themes can be resource-intensive, leading to memory exhaustion errors. To identify such elements:- Deactivate all plugins and switch to a default WordPress theme.
- Gradually reactivate each plugin, one at a time, while monitoring your website’s performance.
- If you encounter memory exhaustion errors after reactivating a specific plugin or theme, consider replacing it with a more lightweight alternative or contacting the developer for optimization.
10. Monitor and Debug Your Website
 Keeping your website running smoothly requires proactive monitoring and effective debugging. You can use tools like New Relic, Query Monitor, or Xdebug to help with debugging and profiling.
These solutions can help you resolve memory exhaustion errors in WordPress and ensure your website runs smoothly, providing a better experience for your visitors. However, it’s essential to regularly maintain and optimize your site to prevent these errors from occurring in the first place.
Keeping your website running smoothly requires proactive monitoring and effective debugging. You can use tools like New Relic, Query Monitor, or Xdebug to help with debugging and profiling.
These solutions can help you resolve memory exhaustion errors in WordPress and ensure your website runs smoothly, providing a better experience for your visitors. However, it’s essential to regularly maintain and optimize your site to prevent these errors from occurring in the first place.
11. Consult Your Hosting Provider
If you’ve tried the above solutions and still face memory exhaustion errors, it’s a good idea to contact your hosting provider’s support team. They may be able to adjust server configurations, allocate additional resources, or offer guidance on optimizing your hosting environment. By following these solutions and best practices, you can effectively handle and prevent memory exhaustion errors in WordPress. Keeping your website optimized, secure, and running smoothly is essential for providing a positive user experience and achieving your online goals.Frequently Asked Questions
1. What causes memory exhaustion errors in WordPress?
Memory exhaustion errors can be caused by various factors, including poorly optimized plugins, themes, excessive resource usage, or inadequate server resources.
2. How do I check the current memory limit for my WordPress site?
You can check your memory limit by accessing the WordPress dashboard, navigating to the “Tools” section, and selecting “Site Health.” There, you’ll find information about your site’s memory limit.
3. What are some common symptoms of memory exhaustion errors?
Common symptoms include white screens of death, errors such as “Fatal error: Allowed memory size exhausted,” or the inability to perform specific tasks, like updating plugins.
4. Can I increase the memory limit for my WordPress site?
Yes, you can increase the memory limit by editing your site’s wp-config.php file or by contacting your web hosting provider for assistance.
5. Are there plugins to help prevent memory exhaustion errors?
Yes, there are plugins that can help optimize your site and reduce memory usage, but it’s essential to use them judiciously and maintain your site’s overall health.
6. How can I prevent memory exhaustion errors in the first place?
You can prevent these errors by adopting best practices, such as optimizing your website’s code, regularly updating plugins and themes, monitoring resource usage, and choosing reliable hosting with sufficient resources.
7. Is it possible to fix memory exhaustion errors without technical expertise?
While some solutions may require technical knowledge, there are user-friendly plugins and tools available to help non-technical users optimize their WordPress websites and prevent memory exhaustion errors.
Conclusion
Navigating the world of WordPress is a fulfilling endeavor, offering endless possibilities for creating exceptional websites. However, as with any journey, you may encounter some roadblocks, and memory exhaustion errors are a common one. The good news is that with the knowledge and solutions presented in this guide, you’re well-equipped to address and prevent these challenges.
By understanding the causes of WordPress memory exhaustion errors, you can take proactive steps to optimize your website and enhance its performance. From efficient coding practices and plugin management to server configurations and server resources, you’ve explored various strategies to keep these errors at bay.
Remember, a well-maintained WordPress website not only ensures a positive user experience but also contributes to your online success. So, as you venture forward, armed with the insights and solutions found here, rest assured that you can handle WordPress memory exhaustion errors with confidence, ensuring your website continues to thrive and serve its purpose effectively.
Fix WordPress Memory Exhaustion Errors and Keep Your Site Running Smoothly!
Keep your WordPress site running at peak performance! Apply these fixes and use optimized themes to maintain a fast, stable, and professional website in 2025.