Navigate the complexities of WordPress connection timeouts effortlessly with our comprehensive guide.
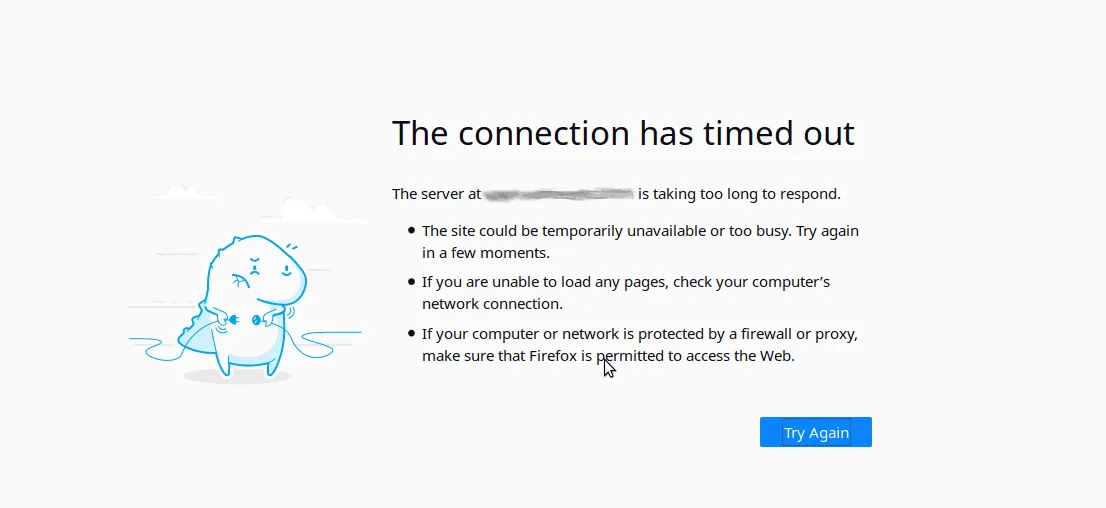
In the fast-paced world of online presence, a smooth and uninterrupted website experience is paramount. However, the dreaded “connection timeout” can throw a wrench into the gears, causing frustration for both website owners and visitors. In our comprehensive guide, we delve into the intricacies of troubleshooting the WordPress connection timeout issue, providing you with a roadmap to diagnose and resolve this common challenge.
As we navigate the complexities of website management, understanding and addressing connection timeouts becomes crucial for maintaining a reliable and responsive online platform. Whether you’re a seasoned WordPress user or just starting your digital journey, this guide aims to empower you with the knowledge and practical insights needed to tackle connection timeout issues head-on.
Step 1: Identify the Issue
1.1 Check Server Logs
When faced with a WordPress connection timeout, the first step is to inspect your server logs. Server logs provide valuable information about errors, warnings, and system activities. By analyzing these logs, you can pinpoint issues related to PHP, MySQL, or your web server (such as Apache or Nginx) timeouts. Here’s how you can check the relevant logs: Check Apache error log:tail -f /var/log/apache2/error.logThis command allows you to continuously monitor the Apache error log in real-time. Look for entries indicating timeouts or any other error messages that might be affecting your WordPress site. Check Nginx error log:
tail -f /var/log/nginx/error.logSimilarly, use this command to keep track of the Nginx error log. Look for entries related to timeouts or any other issues that might be causing the connection problems. Check PHP error log:
tail -f /var/log/php/error.logInspect the PHP error log for entries that might shed light on PHP-related errors or timeouts.
1.2 Review WordPress Logs
In addition to server logs, WordPress has its own logging mechanism that can be instrumental in troubleshooting issues. Enabling WordPress debugging will generate a log file with detailed information about errors and warnings. To enable debugging, modify your wp-config.php file with the following lines:
define('WP_DEBUG', true);
define('WP_DEBUG_LOG', true);
define('WP_DEBUG_DISPLAY', false);
WP_DEBUG: Set to true to enable debugging mode.
WP_DEBUG_LOG: When set to true, WordPress will write errors and warnings to a debug.log file.
WP_DEBUG_DISPLAY: Set to false to prevent errors and warnings from being displayed on the website.
By enabling these settings, you instruct WordPress to log detailed information about errors to a file called debug.log in the /wp-content/ directory.
Review the debug.log file to find clues about what might be causing the connection timeout. Look for timestamps corresponding to the time of the timeout incidents and check for any error messages or warnings that could point to the root cause.
Step 2: Test Basic Connectivity
2.1 Verify Database Connection
A crucial aspect of troubleshooting WordPress connection timeouts is ensuring that WordPress can establish a connection with the database. This involves checking and validating the database credentials specified in the wp-config.php file. The database credentials are vital for WordPress to interact with the underlying database. In your wp-config.php file, you’ll find the following lines:
define('DB_NAME', 'your_database_name');
define('DB_USER', 'your_database_user');
define('DB_PASSWORD', 'your_database_password');
define('DB_HOST', 'localhost');
These define the name of the database (DB_NAME), the database user (DB_USER), the associated password (DB_PASSWORD), and the host where the database resides (DB_HOST).
To ensure that these credentials are correct, execute the following command in your terminal:
mysql -u your_database_user -p -h localhost your_database_nameThis command attempts to connect to the MySQL server using the specified user, password, and database name. If the credentials are correct, you’ll be prompted to enter the password. Upon successful authentication, you’ll be granted access to the MySQL shell. If you encounter an error or are unable to connect, it indicates an issue with the database credentials. Double-check the credentials in your wp-config.php file and ensure they match the actual credentials set up for your MySQL database.
2.2 Check Internet Connection
Another aspect to consider is the stability of your server’s internet connection. A reliable internet connection is essential for WordPress to communicate with external services and resources. You can test the internet connection using the ping command. For example:ping google.comThis command sends a series of packets to Google’s servers and measures the round-trip time. If the connection is stable, you should see responses with round-trip times and no packet loss. If there are issues with the internet connection, you might experience delays or timeouts when WordPress tries to communicate with external services, leading to connection timeouts.
Step 3: Review Server Configuration
3.1 Web Server Configuration
The configuration settings of your web server play a crucial role in handling requests and determining timeouts. In this step, we’ll focus on two popular web servers: Apache and Nginx.
Apache Configuration:
For Apache, you need to check the httpd.conf file for timeout-related directives.
# Open the Apache configuration file
sudo nano /etc/httpd/conf/httpd.conf
Look for the following directives:
Timeout: Specifies the maximum time (in seconds) the server will wait for certain events before timing out.
KeepAliveTimeout: Defines the maximum time (in seconds) the server will wait for subsequent requests on a persistent connection.
For example:Timeout 300 KeepAliveTimeout 5Ensure that these values are appropriately configured based on the requirements of your WordPress site. Adjustments may be necessary if your site experiences frequent connection timeouts. Nginx Configuration: For Nginx, open the Nginx configuration file to inspect the timeout settings.
# Open the Nginx configuration file
sudo nano /etc/nginx/nginx.conf
Look for the keepalive_timeout directive, which specifies the timeout for keep-alive connections in Nginx.
keepalive_timeout 60s;Ensure that this value is set to an appropriate duration. Adjustments may be necessary based on the specific needs and traffic patterns of your WordPress site.
3.2 PHP Configuration
PHP settings, which are defined in the php.ini file, also impact the execution of WordPress scripts. In this step, we’ll specifically look at two critical PHP configuration parameters related to timeouts.max_execution_time = 60 max_input_time = 60max_execution_time: Specifies the maximum time (in seconds) a script is allowed to run before being terminated. max_input_time: Sets the maximum time (in seconds) the PHP interpreter is allowed to wait for data to be received from the client. In the example above, both values are set to 60 seconds. If your WordPress site requires longer execution times, consider adjusting these values accordingly. To modify PHP settings, open the php.ini file:
# Open the PHP configuration file
sudo nano /etc/php.ini
Make the necessary changes and save the file.
Step 4: Check Themes and Plugins
4.1 Disable Plugins WordPress plugins enhance functionality, but conflicts or outdated code can lead to connection timeouts. By systematically deactivating plugins, we can pinpoint which one might be causing the problem. Why Deactivate Plugins? Disabling all plugins serves as a diagnostic measure to identify if any of them are contributing to the connection timeout issue. Sometimes, a conflict between plugins or a single malfunctioning plugin can disrupt the entire site. Step-by-Step Deactivation:
- Access the WordPress Admin Dashboard: Log in and navigate to the “Plugins” section.
- Deactivate All Plugins: Select all plugins and choose “Deactivate” from the bulk action dropdown. Alternatively, deactivate each plugin individually.
- Check Site Functionality: After deactivation, check if the connection timeout issue persists. If it resolves, the next step is to identify the specific problematic plugin.
- Reactivate Plugins One by One: Begin reactivating plugins one by one and test the site after each activation. If the issue reoccurs, the recently activated plugin is likely the culprit.
- Identify and Resolve: Once the problematic plugin is identified, consider updating it or finding an alternative that doesn’t conflict with your WordPress setup.
4.2 Switch to a Default Theme
WordPress themes contribute significantly to a website’s appearance and structure. However, theme-related issues can also lead to connection timeouts. Switching to a default theme helps rule out these potential problems. Why Switch to a Default Theme? Default themes, such as Twenty Twenty-One, are well-maintained and designed to work seamlessly with WordPress updates. If the connection timeout issue persists after deactivating plugins, switching to a default theme helps determine whether the problem lies in the theme’s code. Step-by-Step Theme Switch:- Access the WordPress Admin Dashboard: Navigate to “Appearance” and then “Themes.”
- Activate a Default Theme: Choose a default theme like Twenty Twenty-One and activate it.
- Check Site Functionality: Verify if the connection timeout issue persists with the default theme. If it resolves, the original theme might have compatibility or code-related issues.
- Theme-Specific Troubleshooting: If the default theme resolves the issue, assess the original theme for updates or consult the theme developer for support. Additionally, check for theme-specific configurations causing conflicts.
Step 5: Optimize Database
Efficient database management is crucial for the performance of a WordPress website. Over time, databases can accumulate unnecessary data, leading to increased response times and potential connection timeouts. In this step, we’ll explore the process of optimizing the WordPress database using a popular plugin called WP-Optimize.5.1 Database Optimization
WordPress databases store a variety of information, including posts, pages, comments, and settings. As content is added, modified, and deleted, the database can become fragmented and contain unnecessary data, impacting performance. Why Optimize the Database? Optimizing the database involves cleaning up and organizing data, reducing its size, and improving overall database efficiency. This process can lead to faster query execution and enhanced website responsiveness. Using WP-Optimize: WP-Optimize is a user-friendly plugin that automates the database optimization process. Follow these steps to optimize your WordPress database: Install and Activate WP-Optimize:- Navigate to the WordPress Admin Dashboard.
- Go to “Plugins” and click on “Add New.”
- Search for “WP-Optimize,” then install and activate the plugin.
- Click on “WP-Optimize” to access the plugin’s dashboard.
- Review the suggested optimizations, such as cleaning post revisions, spam comments, and transients.
- Click the “Run all selected optimizations” button to initiate the process.
- Configure WP-Optimize to perform scheduled cleanups by setting automatic optimization intervals.
- Regular cleanups help maintain a well-organized database and prevent the accumulation of unnecessary data over time.
- Manual Queries: For advanced users, running manual SQL queries to optimize specific database tables is an alternative. However, caution is advised to avoid unintended data loss.
- Backup Before Optimization: Before performing any database optimization, ensure you have a recent backup of your website. While tools like WP-Optimize are generally safe, unexpected issues can occur, and having a backup provides a safety net.
- Monitor Performance: After optimization, monitor website performance using tools like Google PageSpeed Insights or GTmetrix to ensure improvements in loading times.
Step 6: Increase Server Resources
In the dynamic world of WordPress, managing server resources effectively is a critical aspect of ensuring optimal performance and responsiveness. This step involves two key strategies: elevating the PHP memory limit through configuration and, when feasible, upgrading the server’s hardware resources—specifically, the CPU and RAM.6.1 Memory Limit
 PHP, the scripting language powering WordPress, relies on memory to execute various operations, from processing images to handling database queries. If your website experiences memory-related issues, such as connection timeouts or failed script executions, it may be beneficial to boost the PHP memory limit.
Why Increase PHP Memory Limit?
Resource-Intensive Operations: Certain tasks, like image processing or intricate plugin functionalities, may demand more memory than the default limit allows.
Handling Concurrent Requests: During periods of heightened traffic, a higher PHP memory limit enables the server to efficiently manage multiple concurrent requests without compromising performance.
How to Increase PHP Memory Limit:
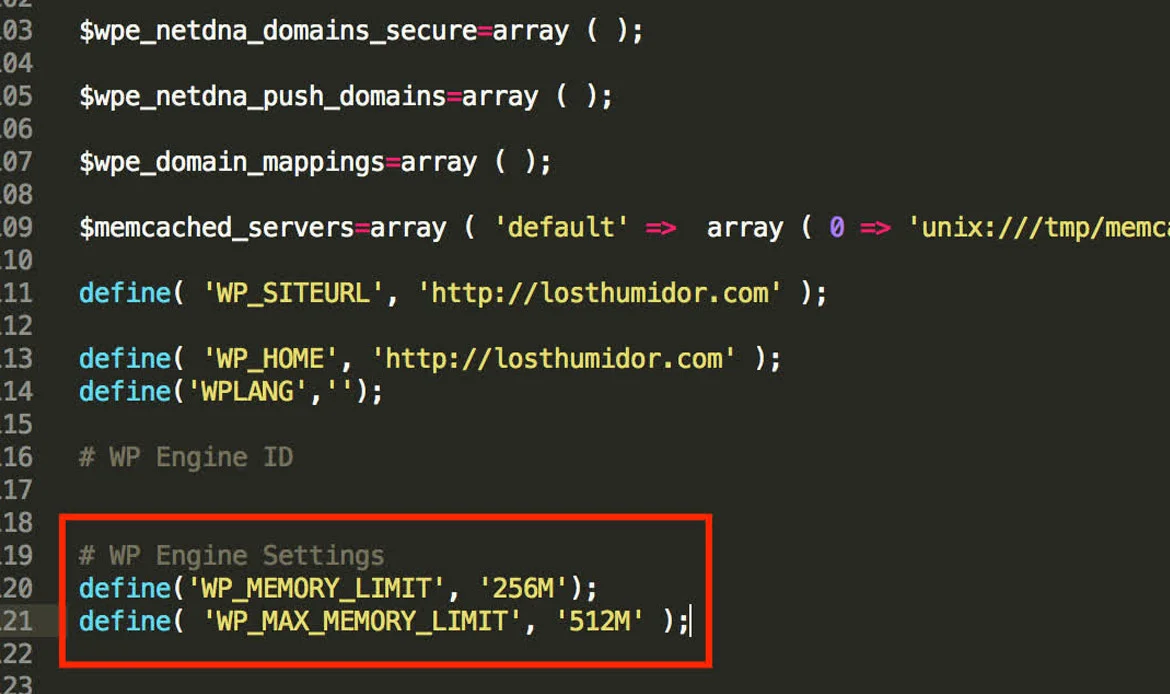
Locate wp-config.php:
PHP, the scripting language powering WordPress, relies on memory to execute various operations, from processing images to handling database queries. If your website experiences memory-related issues, such as connection timeouts or failed script executions, it may be beneficial to boost the PHP memory limit.
Why Increase PHP Memory Limit?
Resource-Intensive Operations: Certain tasks, like image processing or intricate plugin functionalities, may demand more memory than the default limit allows.
Handling Concurrent Requests: During periods of heightened traffic, a higher PHP memory limit enables the server to efficiently manage multiple concurrent requests without compromising performance.
How to Increase PHP Memory Limit:
Locate wp-config.php:
- Access your WordPress installation’s root directory via FTP or a file manager provided by your hosting service.
- Look for the wp-config.php file, a key configuration file for your WordPress site.
- Open wp-config.php using a text editor, such as Notepad or Visual Studio Code.
- Insert the following line near the top of the file, just before the comment “/* That’s all, stop editing! Happy blogging. */”:
define('WP_MEMORY_LIMIT', '256M');
Adjust the memory limit value (‘256M’ in this example) based on your website’s requirements.
Save Changes:
Save the modified wp-config.php file and upload it back to your server.
Verification:
Confirm the PHP memory limit increase by checking your WordPress dashboard or using plugins like WP-Serverinfo.
By elevating the PHP memory limit, you provide your WordPress site with the breathing room it needs to handle complex tasks and surges in traffic, ultimately contributing to a more robust and efficient online presence.
6.2 Server Resources
Beyond PHP memory adjustments, upgrading the server’s central processing unit (CPU) and random access memory (RAM) can have a profound impact on overall performance, especially during periods of increased website traffic. Why Upgrade Server Resources? Capacity for Increased Traffic: Upgrading CPU and RAM equips the server to manage a higher volume of concurrent users and requests. Enhanced Processing Speed: A more powerful CPU and additional RAM result in faster execution of scripts and improved overall server responsiveness. How to Upgrade Server Resources:- Contact Hosting Provider: Reach out to your hosting provider’s support team to discuss available upgrade options for CPU and RAM.
- Explore Hosting Plans: Investigate hosting plans that offer higher CPU and RAM allocations.
- Consider transitioning to a Virtual Private Server (VPS) or Dedicated Server for more dedicated resources.
- Resource Monitoring: Use tools provided by your hosting provider or third-party monitoring solutions to assess current resource usage and identify potential bottlenecks.
- Evaluate Scaling Strategies: For sustained high traffic, explore scaling strategies such as load balancing or implementing Content Delivery Networks (CDNs).
- Regular Performance Monitoring: Continuously monitor server performance to ensure that the upgraded resources effectively address any previous performance issues. By addressing both PHP memory limitations and upgrading server resources, you fortify your WordPress site against performance bottlenecks, reducing the risk of connection timeouts and ensuring a seamless and responsive user experience for visitors.
Step 7: Monitor Performance
Keeping a vigilant eye on the performance of your WordPress site is crucial for identifying potential issues, ensuring optimal functionality, and delivering a seamless user experience. In this step, we’ll explore the importance of performance monitoring and how to implement monitoring tools to detect and address performance bottlenecks.7.1 Use Monitoring Tools
Performance monitoring tools offer valuable insights into various aspects of your server and website, helping you proactively identify and address issues before they impact users. Two notable tools are New Relic and sysstat, each serving specific monitoring purposes. Why Use Monitoring Tools? Early Issue Detection: Monitoring tools provide real-time data on server performance, allowing you to detect issues such as high resource usage or bottlenecks before they escalate. Data-Driven Decision Making: Comprehensive performance data enables informed decisions for optimizations, resource allocations, and infrastructure improvements. Implementing Monitoring Tools: New Relic:- Sign Up for New Relic: Visit the New Relic website and sign up for an account.
- Install New Relic Agent: Follow the instructions provided by New Relic to install the agent on your server.
- Configure Settings: Customize settings based on your monitoring requirements, such as setting up alerts for specific performance thresholds.
- Analyze Performance Data: Utilize the New Relic dashboard to analyze data related to response times, throughput, error rates, and more.
1. Install sysstat:
On Linux systems, you can install sysstat using package managers like apt or yum:sudo apt-get install sysstat # For Debian/Ubuntu
sudo yum install sysstat # For CentOS/RHEL
2. Configure sysstat:
Edit the sysstat configuration file (typically located at /etc/default/sysstat) to enable and configure data collection:ENABLED="true"Save the file and restart the sysstat service.
3. Access Performance Data:
Use commands like sar to access historical performance data and analyze system usage metrics.Additional Monitoring Practices:
- Content Delivery Network (CDN) Monitoring: If using a CDN, monitor its performance to ensure efficient content delivery to users worldwide.
- Database Query Performance: Use tools like MySQL’s slow query log or plugins such as Query Monitor for WordPress to identify and optimize slow database queries.
- Website Uptime Monitoring: Employ uptime monitoring services to receive alerts if your website experiences downtime.
- User Experience Monitoring: Implement tools like Google PageSpeed Insights or GTmetrix to evaluate website loading times and identify areas for improvement.
Continuous Improvement:
- Regularly Review Reports: Schedule regular reviews of monitoring reports to identify trends, patterns, or anomalies.
- Adjust Alerts: Fine-tune alert thresholds based on changing traffic patterns or system usage.
- Infrastructure Scaling: If consistent high traffic is observed, consider scaling your infrastructure to meet growing demands.
Step 8: Consult Hosting Provider
8.1 Contact Hosting Support
When persistent connection timeout issues remain unresolved after implementing the previous steps, reaching out to your hosting provider’s support team is a strategic move. Hosting support can provide insights into server-specific configurations, diagnose potential server-side issues, and offer tailored solutions to address the problem.Why Contact Hosting Support?
Server-Specific Expertise: Hosting support teams possess in-depth knowledge of their server configurations, ensuring a targeted approach to problem-solving. Infrastructure Insights: Hosting providers can assess server logs, network configurations, and other server-specific parameters that may be contributing to the connection timeouts.How to Contact Hosting Support:
Access Support Channels:- Log in to your hosting provider’s dashboard or website.
- Locate the “Support,” “Help,” or “Contact Us” section.
Choose Contact Method:
- Hosting providers typically offer various contact methods, including live chat, ticket systems, email, or phone support.
- Choose the method that aligns with your preference or urgency.
Provide Detailed Information:
When contacting support, provide a detailed description of the issue, including:- Specific error messages.
- Steps taken to troubleshoot.
- Any recent changes or updates made to the website.
Attach Relevant Logs or Screenshots:
- If applicable, attach logs, error messages, or screenshots related to the connection timeout issue.
- This additional information can expedite the troubleshooting process.
Ask for Server-Specific Insights:
Request assistance in reviewing server logs, configurations, or any server-specific settings that may impact website performance. Follow Up: If the issue persists or if there are delays in resolution, follow up with the support team to ensure your case is actively being addressed.Additional Considerations:
- Managed Hosting Services: If you’re using a managed hosting service, take advantage of their expertise in WordPress-specific optimizations and configurations.
- Server Maintenance and Upgrades: Inquire about any ongoing server maintenance or upgrades that may affect your website’s performance.
- Scalability Options: Discuss scalability options if your website experiences consistent high traffic that may be contributing to the connection timeouts.
- Service-Level Agreements (SLAs): Understand the terms of your hosting provider’s SLA, including response times and escalation procedures.
Seeking assistance from your hosting provider is a collaborative effort to resolve server-related issues impacting your WordPress site. By leveraging their expertise and insights into server configurations, you can navigate through intricate server environments and work towards a solution that ensures the optimal performance of your website.
Frequently Asked Questions About WordPress Connection Timeout Issues
What causes a WordPress connection timeout?
A connection timeout in WordPress usually occurs when the server takes too long to respond. Common causes include slow hosting servers, overloaded databases, heavy plugins, large media files, or incorrect PHP settings.
How can I fix a WordPress connection timeout error?
You can fix connection timeout errors by optimizing your website’s plugins, increasing PHP memory limit, checking server performance, or upgrading your hosting plan. Deactivating unnecessary plugins and cleaning up large databases can also help improve response times.
Does using a CDN help prevent connection timeout issues?
Yes, using a Content Delivery Network (CDN) can help reduce server load and improve website speed. By serving static content from multiple locations worldwide, a CDN ensures faster response times, reducing the likelihood of connection timeouts for your visitors.
Conclusion
In conclusion, mastering the art of troubleshooting WordPress connection timeouts is an essential skill for every website owner. We’ve embarked on a comprehensive journey through the intricacies of this common challenge, offering insights, practical tips, and step-by-step solutions to empower you in keeping your website consistently accessible and responsive.
By understanding the potential causes behind connection timeouts and implementing the recommended strategies, you’ve taken a proactive stance in ensuring a seamless online experience for your visitors. Remember, the digital landscape is ever-evolving, and staying ahead of potential issues is key to maintaining a resilient and reliable website.
Solve WordPress Connection Timeout Issues Fast!
Our lightweight, speed-optimized, and responsive WordPress themes ensure your site loads quickly and runs without interruptions. Perfect for business, agency, and eCommerce websites, our themes help prevent downtime and boost overall performance. Keep your site connected and your visitors engaged always!