Welcome to “The Ultimate Guide to Resolving Common WordPress Login Issues” – your go-to resource for mastering the art of navigating and overcoming the challenges associated with accessing your WordPress site. As any WordPress user knows, a smooth and secure login process is paramount to a successful online presence. This comprehensive guide is designed to empower you with practical insights, expert tips, and step-by-step solutions to tackle the most common login issues that users encounter.
Whether you’re a seasoned WordPress enthusiast or just embarking on your online journey, encountering login hurdles is not uncommon. From forgotten passwords to mysterious error messages, this guide is crafted to demystify the complexities and provide you with the tools you need to ensure a seamless experience for yourself and your site’s users.
We’ll delve into the root causes of these issues, offering clear explanations and actionable strategies to troubleshoot and resolve them. With our guidance, you’ll gain a deeper understanding of WordPress login mechanisms, bolster your site’s security, and ultimately enhance the overall user experience.
Join us on this journey as we explore the intricacies of WordPress login problems, equipping you with the knowledge to transform challenges into opportunities for growth. Let’s unlock the full potential of your WordPress site by conquering common login issues together. Your path to a frustration-free, secure, and user-friendly WordPress login experience starts here.
1. Forgotten Password:
Issue:
One of the most common reasons users can’t log in is a forgotten password. This can happen when users haven’t logged in for a while or if they have multiple passwords to remember.
Solution:
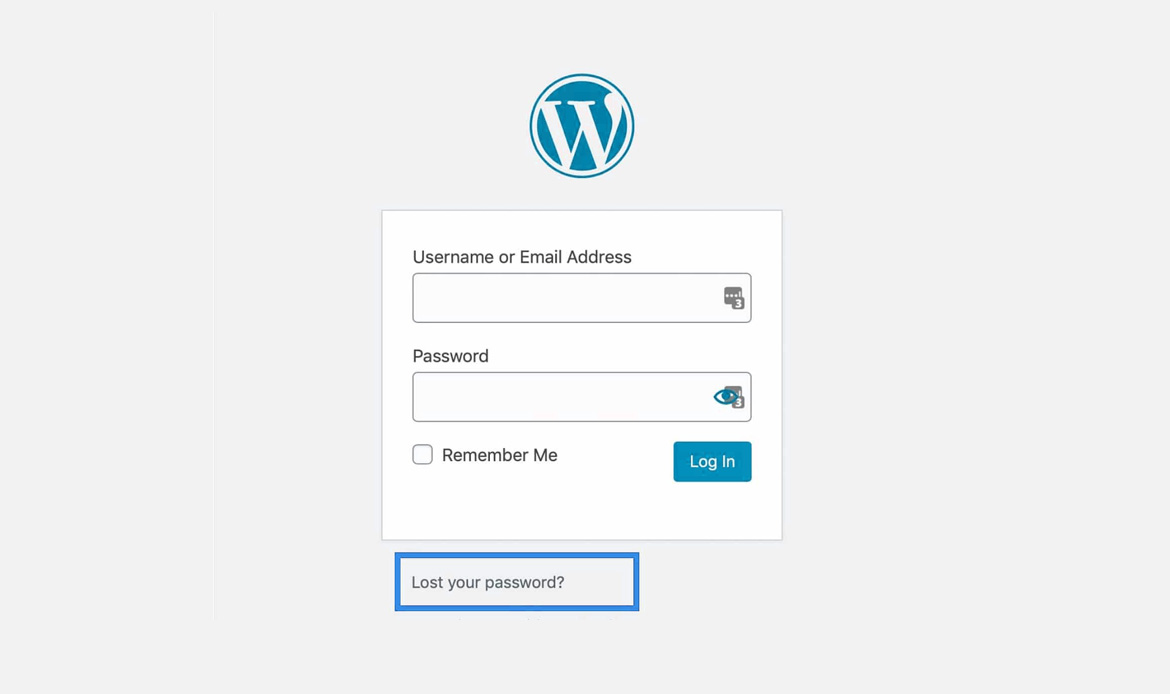
Use the “Lost your password?” link on the login page to reset your password. WordPress will send a password reset link to your registered email address. Follow the link and create a new password.
2. Incorrect Username:
Issue:
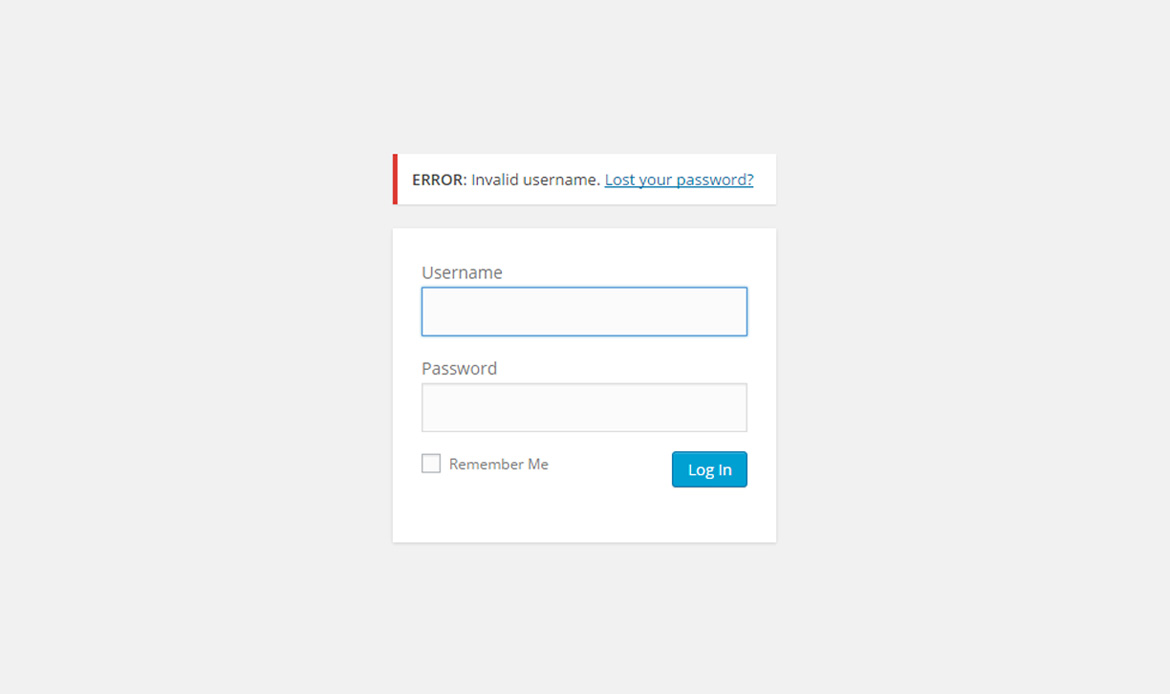
Sometimes users enter the wrong username when attempting to log in.
Solution:
Step 1: Access the WordPress Login Page
Open your web browser and navigate to the login page of your WordPress website. The URL is typically “yourdomain.com/wp-login.php” or “yourdomain.com/wp-admin.”
Step 2: Click on “Lost your password?”
On the WordPress login page, locate and click on the “Lost your password?” link. This link is usually positioned below the login form.
Step 3: Enter Your Email Address
On the password recovery page, you will be prompted to enter either your username or the email address associated with your WordPress account. Since you suspect an incorrect username, it’s advisable to use your email address.
Step 4: Click “Get New Password”
After entering your email address, click on the “Get New Password” or similar button. WordPress will send a password reset link to the email address associated with your account.
Step 5: Check Your Email
Open your email inbox, and you should find a message from WordPress containing a password reset link. This email is sent to the email address associated with your WordPress account.
Step 6: Click the Password Reset Link
In the email, there will be a link that says something like “Click here to reset your password.” Click on this link. It will redirect you to a page on your WordPress site where you can set a new password.
Step 7: Confirm Your Username
While setting a new password, take note of the username mentioned on the password reset page. Confirm that it matches the username you intended to use.
Step 8: Set a New Password
On the password reset page, enter a new password for your account. Choose a strong and secure password, and WordPress typically provides a strength indicator.
Step 9: Save Changes
After entering the new password, save the changes. This action updates your WordPress account with the new password, linked to the confirmed username.
Step 10: Log In with Correct Username and New Password
Return to the WordPress login page and log in using the correct username and the newly set password. You should now have successfully regained access to your WordPress dashboard.
By following these step-by-step instructions, you can efficiently resolve the issue of an incorrect username and regain access to your WordPress website. Remember to keep your login credentials secure and consider using a password manager for added convenience and security.
3. Brute Force Attacks:
Issue:
Brute force attacks involve multiple login attempts to guess your password, leading to account lockouts.
Solution:
Step 1: Identify the Issue
Recognize signs of a potential brute force attack. This may include multiple failed login attempts, account lockouts, or suspicious activity in your website logs.
Step 2: Install a Security Plugin
Choose a reputable security plugin for WordPress. Popular options include Wordfence, Sucuri Security, or iThemes Security. These plugins offer features to enhance the security of your website.
Step 3: Install the Chosen Security Plugin
Access your WordPress dashboard and navigate to the “Plugins” section. Click on “Add New” and search for the chosen security plugin. Install and activate the plugin.
Step 4: Configure Login Attempt Limits
Once the security plugin is active, configure settings related to login attempt limits. Set a reasonable threshold for the number of failed login attempts allowed before a user is locked out. This helps prevent brute force attacks.
Step 5: Enable Two-Factor Authentication (2FA)
Many security plugins offer two-factor authentication as a feature. Enable 2FA for an additional layer of security. This typically involves receiving a verification code on your mobile device during the login process.
Step 6: Set Up IP Blocking
Some security plugins allow you to block specific IP addresses or ranges after a certain number of failed login attempts. Configure this feature to automatically block IP addresses associated with suspicious activity.
Step 7: Monitor Security Alerts
Regularly check security alerts provided by the plugin. These alerts may notify you of suspicious login attempts, blocked IP addresses, or other security-related events.
Step 8: Regularly Update the Security Plugin
Ensure that the security plugin is regularly updated to the latest version. Plugin updates often include security patches and new features to combat evolving threats.
Step 9: Educate Users on Strong Passwords
Encourage users, including yourself, to use strong and unique passwords. A combination of uppercase and lowercase letters, numbers, and symbols makes it more challenging for attackers to guess passwords.
Step 10: Periodically Review Security Settings
Periodically review and adjust your security plugin settings based on your website’s needs and any changes in security threats. This proactive approach helps maintain a robust defense against brute force attacks.
If you do these things, you’ll be able to effectively protect your WordPress website from brute force attacks. Implementing a security plugin, configuring settings, enabling 2FA, and promoting strong password practices collectively contribute to a more secure online environment.
4. White Screen of Death
Issue:
Sometimes, after entering login credentials, users encounter a white screen without any error message.
Solution:
Step 1: Access Your WordPress Directory via FTP
Use an FTP (File Transfer Protocol) client such as FileZilla or Cyberduck to connect to your website’s server. You will need your FTP credentials, which are usually provided by your hosting provider.
Step 2: Navigate to the “wp-content” Directory
Once connected via FTP, locate and access the “wp-content” directory within your WordPress installation. This is where your themes and plugins are stored.
Step 3: Rename the “plugins” Directory
Inside the “wp-content” directory, find the “plugins” folder. Right-click on it and choose the option to rename it. You can give it any name, for example, “plugins_old.” Renaming the folder deactivates all plugins at once.
Step 4: Check the WordPress Site
Visit your WordPress site in a web browser. If the white screen issue is resolved, it confirms that a plugin was causing the problem.
Step 5: Identify the Problematic Plugin
Now that you’ve identified that plugins are the issue, you’ll need to identify which specific plugin is causing the conflict. Go back to the FTP client and rename the “plugins_old” folder back to “plugins.”
Step 6: Deactivate Plugins One by One
Inside the “plugins” folder, start renaming each individual plugin folder one by one. After renaming each folder, check your WordPress site. When the white screen issue reoccurs, you’ve found the problematic plugin.
Step 7: Delete or Replace the Problematic Plugin
Once you’ve identified the problematic plugin, you can choose to delete it if it’s not crucial for your website, or you can look for an updated version of the plugin that is compatible with your WordPress version.
Step 8: Check Your Theme
If deactivating plugins did not resolve the issue, the next step is to check your theme. Navigate back to the “wp-content” directory and locate the “themes” folder.
Step 9: Rename the Current Theme Directory
Similar to the process with plugins, rename your current theme’s folder. This deactivates the current theme.
Step 10: Activate a Default WordPress Theme
With your current theme deactivated, WordPress will automatically activate a default theme like Twenty Twenty-One. Check your site to see if the white screen issue is resolved. If it is, there might be an issue with your theme.
Step 11: Investigate Theme Issues
If the default theme works fine, there may be an issue with your original theme. Ensure your theme is updated to the latest version. If the problem persists, you may need to contact the theme developer for assistance.
Just follow these steps, and you’ll systematically identify and resolve the “White Screen of Death” issue caused by a theme or plugin conflict in WordPress. This process helps you pinpoint the specific element causing the problem and take appropriate action to fix it.
5. Cookies and Cache Problems
Issue:
Browser cookies and cached data can sometimes interfere with the login process.
Solution:
Step 1: Access Your Web Browser’s Settings
Open the web browser you use to access your WordPress site.
Step 2: Clear Cookies and Cache
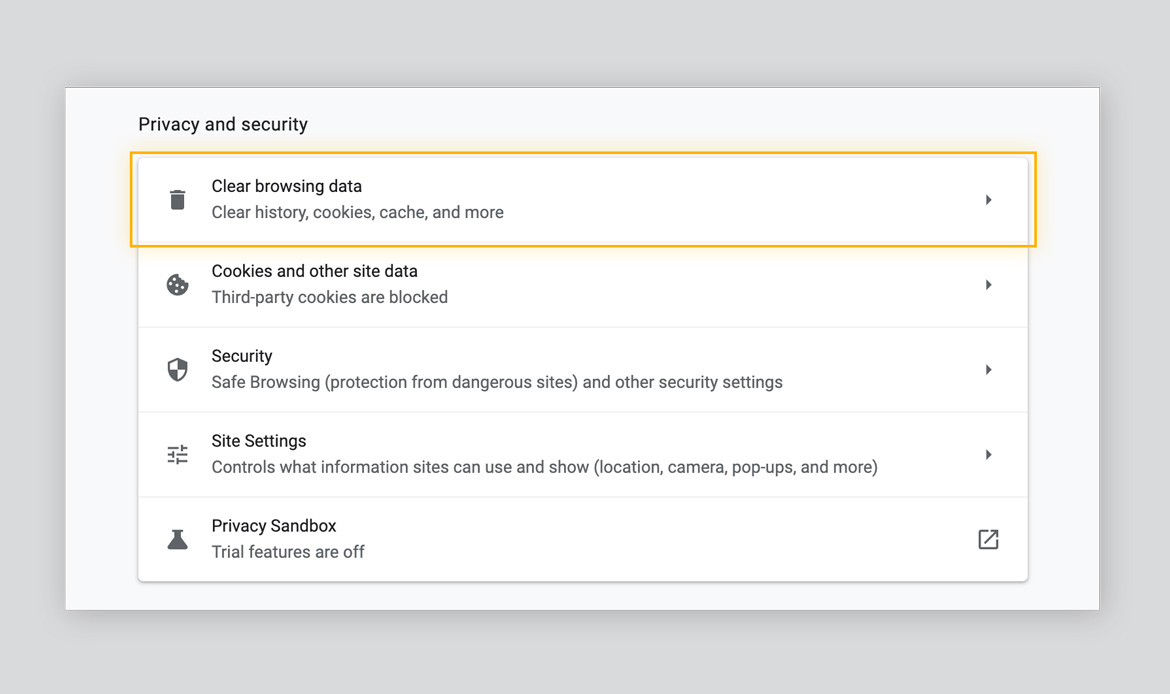
Depending on your browser, the process may vary, but generally, you can find the option to clear cookies and cache in the browser settings. Look for a section like “Privacy,” “History,” or “Browsing Data.”
For Google Chrome:
- Click on the three dots in the top-right corner.
- Go to “More tools” and then “Clear browsing data.”
- Choose “Cookies and other site data” and “Cached images and files.”
- Click “Clear data.”
For Mozilla Firefox:
- Click on the three horizontal lines in the top-right corner.
- Go to “Library” and then “History.”
- Click on “Clear Recent History.”
- Select “Everything” in the “Time range to clear” dropdown.
- Check “Cookies” and “Cache” and click “Clear Now.”
For Safari:
- Click on “Safari” in the top menu and choose “Preferences.”
- Go to the “Privacy” tab.
- Click on “Manage Website Data” and then “Remove All.”
- Confirm the action.
Step 3: Restart Your Browser
After clearing cookies and cache, close and reopen your web browser.
Step 4: Access WordPress Login Page
Visit the WordPress login page again (yourdomain.com/wp-login.php or yourdomain.com/wp-admin).
Step 5: Attempt to Log In
Enter your username and password and try to log in as usual. Clearing cookies and cache should resolve issues caused by stored, outdated data.
Step 6: Use Incognito or Private Browsing Mode
If the problem persists, try using your browser’s incognito or private browsing mode. This mode bypasses cached data and cookies.
For Google Chrome:
Click on the three dots and select “New incognito window” or press Ctrl+Shift+N (Windows/Linux) or Cmd+Shift+N (Mac).
For Mozilla Firefox:
Click on the three horizontal lines and select “New Private Window” or press Ctrl+Shift+P (Windows/Linux) or Cmd+Shift+P (Mac).
For Safari:
Click on “File” and choose “New Private Window.”
Step 7: Log In Using Incognito or Private Browsing
In the incognito or private browsing window, visit the WordPress login page and attempt to log in with your credentials.
By following these steps, you effectively clear cookies and cache from your browser, eliminating potential conflicts that might be causing login issues on your WordPress site. If the problem persists, consider checking other factors such as browser extensions or reaching out to your hosting provider for assistance.
6. Incorrect URL:
Issue:
Logging in from the wrong URL can lead to login failures.
Solution:
Step 1: Open Your Web Browser
Launch the web browser you typically use to access your WordPress website.
Step 2: Check the URL Format
Ensure that you are using the correct format for the WordPress login URL. The standard formats are:
“yourdomain.com/wp-login.php”
“yourdomain.com/wp-admin”
Step 3: Enter the Correct URL
In the address bar of your web browser, type in the correct WordPress login URL based on the standard formats mentioned above.
Step 4: Press Enter
Hit the “Enter” key on your keyboard or click the “Go” button to navigate to the WordPress login page.
Step 5: Verify the Login Page
Confirm that you are on the official WordPress login page. The login page typically includes fields to enter your username and password.
Step 6: Enter Your Credentials
Input your WordPress username and password in the respective fields.
Step 7: Click “Log In”
After entering your credentials, click on the “Log In” button to attempt the login.
Step 8: Check for Successful Login
If you’ve used the correct URL and entered the right credentials, you should be successfully logged into your WordPress dashboard.
Step 9: Save the Correct URL
To avoid future login issues, make sure to save the correct WordPress login URL in your browser bookmarks or notes.
Step 10: Update Bookmarks or Shortcuts
If you have bookmarks or shortcuts for the WordPress login page, update them with the correct URL to ensure easy and direct access in the future.
If you go through these steps, you’ll ensure that you are using the correct WordPress login URL, minimizing the risk of login failures caused by entering the wrong web address. Keeping the URL accurate and bookmarked can save time and prevent login issues in the future.
7. PHP Memory Limit Exhaustion:
Issue:
WordPress may not have enough memory to handle certain operations, causing login issues.
Solution:
Step 1: Access Your WordPress Files
Connect to your website’s server using an FTP client (such as FileZilla) or use the file manager provided by your hosting control panel.
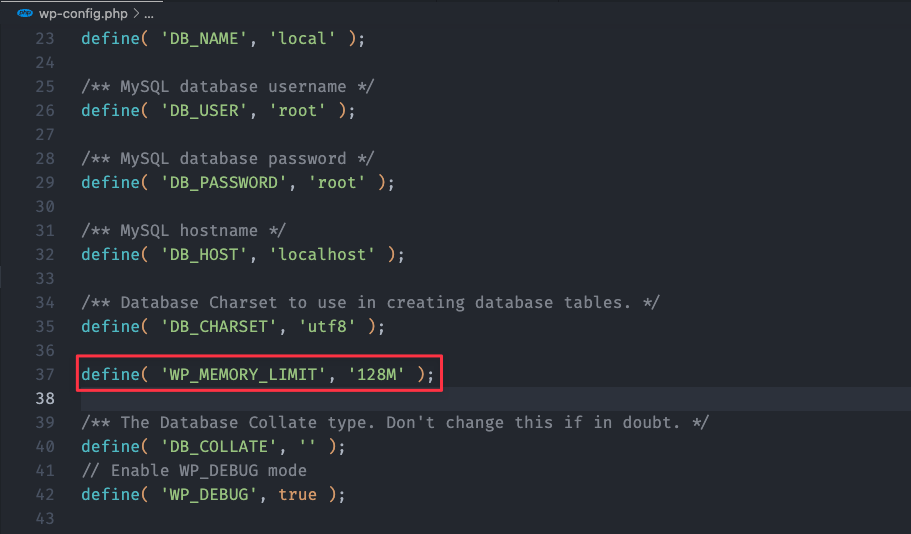
Step 2: Locate the “wp-config.php” File
Navigate to the root directory of your WordPress installation. Look for a file named “wp-config.php.”
Step 3: Download a Backup of “wp-config.php” (Optional but Recommended)
Before making any changes, it’s advisable to download a backup copy of the “wp-config.php” file to your local computer. This ensures you can revert to the original file if needed.
Step 4: Open “wp-config.php” for Editing
Right-click on the “wp-config.php” file and choose an editor to open the file. You can use a text editor like Notepad (on Windows), TextEdit (on Mac), or a code editor like Visual Studio Code.
Step 5: Add the PHP Memory Limit Code
Within the “wp-config.php” file, look for the section that contains other PHP constants. It typically looks like this:
/* That's all, stop editing! Happy blogging. */
Just above or below this line, add the following code:
define('WP_MEMORY_LIMIT', '256M');
You can adjust the memory limit value based on your requirements. The example sets it to 256 megabytes.
Step 6: Save the Changes
Save the changes you made to the “wp-config.php” file.
Step 7: Upload the Modified File
If you downloaded a backup copy in Step 3, you can skip this step if everything is correct. Otherwise, if you made changes directly on the server, upload the modified “wp-config.php” file back to the server, replacing the original file.
Step 8: Verify the Changes
To ensure the changes took effect, log in to your WordPress admin dashboard. Go to “Tools” > “Site Health” > “Info” and look for the PHP memory limit. It should now reflect the value you set.
Follow these simple rules, and you can increase the PHP memory limit for your WordPress site, which can help resolve login issues caused by memory exhaustion. If you encounter difficulties or are uncomfortable making these changes, consider reaching out to your hosting provider for assistance.
8. Corrupted WordPress Files:
Issue:
If core WordPress files are corrupted, it can impact the login process.
Solution:
Step 1: Backup Your WordPress Site
Before proceeding with any major changes, it’s crucial to create a backup of your WordPress site to ensure you can restore it if anything goes wrong. You can use a WordPress backup plugin or your hosting provider’s backup tools for this.
Step 2: Download the Latest Version of WordPress
Visit the official WordPress website at wordpress.org.
Click on the “Get WordPress” button to download the latest version of WordPress in a zip file.
Step 3: Extract the Downloaded WordPress Zip File
Once the download is complete, extract the contents of the zip file to a location on your computer.
Step 4: Access Your Website Files
Connect to your website’s server using an FTP client (e.g., FileZilla) or the file manager provided by your hosting control panel.
Step 5: Navigate to the WordPress Installation Directory
In your website’s root directory, locate the folder where WordPress is installed. This is typically the public_html directory or a folder named after your domain.
Step 6: Delete the wp-admin and wp-includes Directories
In your WordPress installation directory on the server, delete the “wp-admin” and “wp-includes” directories. These directories contain core files that will be replaced with the new ones.
Step 7: Upload the New WordPress Files
From the extracted WordPress folder on your computer, upload the “wp-admin” and “wp-includes” directories to your server, replacing the ones you deleted.
Step 8: Upload Individual Files
Upload all the files (not folders) from the extracted WordPress folder to your server, overwriting the existing files. Ensure that you maintain the directory structure during the upload.
Step 9: Maintain wp-config.php and wp-content Directory
Do not upload the “wp-config.php” file, as it contains your site-specific configuration. Similarly, avoid uploading the “wp-content” directory to preserve your themes, plugins, and uploaded media.
Step 10: Visit Your WordPress Site
After uploading the new files, visit your WordPress site in a web browser. You may need to log in again. Check if the login issues have been resolved.
Step 11: Verify Your Website’s Functionality
Navigate through different pages and functionalities of your website to ensure everything is working as expected. Check critical areas such as plugins, themes, and custom functionalities.
If you follow what it says, you can reinstall WordPress with fresh core files, resolving issues caused by corrupted files that might be impacting the login process. Always proceed with caution, and having a backup ensures you have a safety net in case anything goes wrong during the reinstallation process.
Additional Tips and Best Practices:
1. Keep Software Updated:
Regularly update your WordPress core, themes, and plugins to benefit from the latest security patches and improvements. Outdated software can be vulnerable to security threats.
2. Use Strong Usernames and Passwords:
Create strong, unique usernames and passwords for your WordPress accounts. Avoid using default usernames like “admin” and consider using a password manager to generate and store complex passwords securely.
3. Implement Two-Factor Authentication (2FA):
Enable two-factor authentication to add an extra layer of security to your login process. This typically involves receiving a verification code on your mobile device, enhancing the security of your WordPress account.
4. Monitor Login Activity:
Install a security plugin that provides login activity logs. Monitoring these logs can help you identify suspicious login attempts or unauthorized access, allowing you to take preventive action.
5. Check File and Folder Permissions:
Ensure that the file and folder permissions on your server are correctly configured. Incorrect permissions can lead to login issues. Directories should typically have permissions set to 755, and files should have permissions set to 644.
6. Investigate Hosting Issues:
If you’ve ruled out issues on the WordPress side, it’s worth checking with your hosting provider. They can assist with server-related problems, ensuring that server configurations and settings are optimal for WordPress.
7. Disable WordPress Plugins:
If you suspect a plugin is causing login issues, deactivate all plugins via FTP and then reactivate them one by one to identify the problematic plugin. Alternatively, use the “rename the plugins folder” method to disable all plugins at once.
8. Review Theme Compatibility:
If the issue arises after changing your theme, consider reverting to the default WordPress theme (e.g., Twenty Twenty-One) to check for compatibility issues. If the problem resolves, contact the theme developer for assistance.
9. Check the wp-config.php File:
Ensure that there are no extra spaces or lines at the beginning or end of the wp-config.php file. Such issues can cause headers already sent errors and disrupt the login process.
10. Seek Community Support:
If you’ve exhausted your troubleshooting options, reach out to the WordPress community for assistance. Forums, community websites, and support channels can provide valuable insights and solutions to specific login issues.
11. Debugging with wp-config.php:
If you encounter persistent issues and need more detailed error messages, you can enable WordPress debugging by adding the following lines to your wp-config.php file:
php define(‘WP_DEBUG’, true); define(‘WP_DEBUG_LOG’, true); define(‘WP_DEBUG_DISPLAY’, false); This will log errors to a debug.log file in your wp-content directory. Reviewing this log can provide valuable information about the root cause of login problems.
12. Examine Database Issues:
Database corruption or issues can also lead to login problems. Use tools like phpMyAdmin to inspect your WordPress database for potential errors or inconsistencies. Ensure you have a recent backup before making any changes.
13. Clear DNS Cache:
If you’ve recently migrated your website or changed domain settings, your DNS cache might be causing login issues. Clear your DNS cache or use a different device/network to see if the problem persists.
14. Consider Browser-related Problems:
Occasionally, browser-related issues such as corrupted cookies or cache can interfere with the login process. Try accessing your WordPress login page using a different browser or an incognito/private window.
15. Third-Party Security Services:
If you’re using third-party security services or firewalls, they might block your login attempts. Whitelist your IP address or adjust the security settings to ensure they are not preventing legitimate logins.
16. Evaluate Server Resources:
Insufficient server resources, such as low PHP memory limits or limited server resources, can cause login failures. Check your server logs for any resource-related errors and consult your hosting provider for assistance.
17. Password Policy Compliance:
Ensure that your password complies with the password policy set by your hosting provider. Some hosting providers enforce specific password requirements for security purposes.
18. Temporary Disable Security Plugins:
Security plugins, while essential, can sometimes be overzealous. Temporarily disable your security plugins to see if they are the cause of login issues. If so, adjust their settings accordingly.
19. Hosting Server Timezone:
Ensure that the server timezone is correctly set. A mismatch between your WordPress settings and the server timezone can sometimes lead to login problems.
20. Consult WordPress Support:
If all else fails, consider reaching out to official WordPress support channels. The WordPress community is vast, and there are dedicated forums and support channels where experienced users and developers can provide guidance on specific issues.
By following these additional tips and best practices, you can not only resolve common WordPress login error but also enhance the overall security and stability of your website. Regularly auditing and maintaining your WordPress site will contribute to a smoother user experience and protect against potential security threats.
Conclusion
In conclusion, we’ve embarked on a journey through “The Ultimate Guide to Resolving Common WordPress Login Issues,” a comprehensive resource aimed at empowering you to overcome obstacles and ensure a seamless login experience for your WordPress site.
Through this guide, we’ve explored the root causes of common login issues, offering practical solutions and expert insights to navigate the complexities. From forgotten passwords to error messages and security concerns, you’ve gained the knowledge to troubleshoot and resolve these challenges effectively.
As you implement the strategies outlined in this guide, remember that a secure and user-friendly login process is not just a technical necessity but a critical component of your overall online presence. By mastering the art of WordPress login troubleshooting, you’re not only enhancing the security of your site but also elevating the experience for yourself and your users.
Continuously stay informed about the latest updates and best practices in WordPress security to ensure ongoing success. Regularly review and update your login protocols, leverage two-factor authentication, and stay vigilant against potential threats.
Thank you for joining us on this exploration of WordPress login intricacies. Armed with the insights from this guide, you are better equipped to transform challenges into opportunities for growth, making your WordPress journey smoother, more secure, and user-focused. Here’s to a frustration-free and successful WordPress experience!

